CityGov
Theme Documentation
Hello there...
Thank you for purchasing my theme. If you have any questions that are beyond the scope of this help file, please feel free to contact me via Support page. Thanks so much!
By: Dannci & Themnific | Support*
* Please note, that theme support does not include:- Customization and installation services
- Support for third party software and plug-ins
Theme Instalation
Installation via WP Dashboard:
- Unzip/extract the main (downloaded) theme package – to get
citygov.zipfile, - Go to Appearance >Themes,
- click on “Add New” > and “Upload theme”,
- click on ‘Browse’ button, find
citygov.zipfile on your computer and press 'Install Now', - Activate theme,
- After theme activation go to Appearance > Install Plugins, and install and activate Redux Framework plugin!
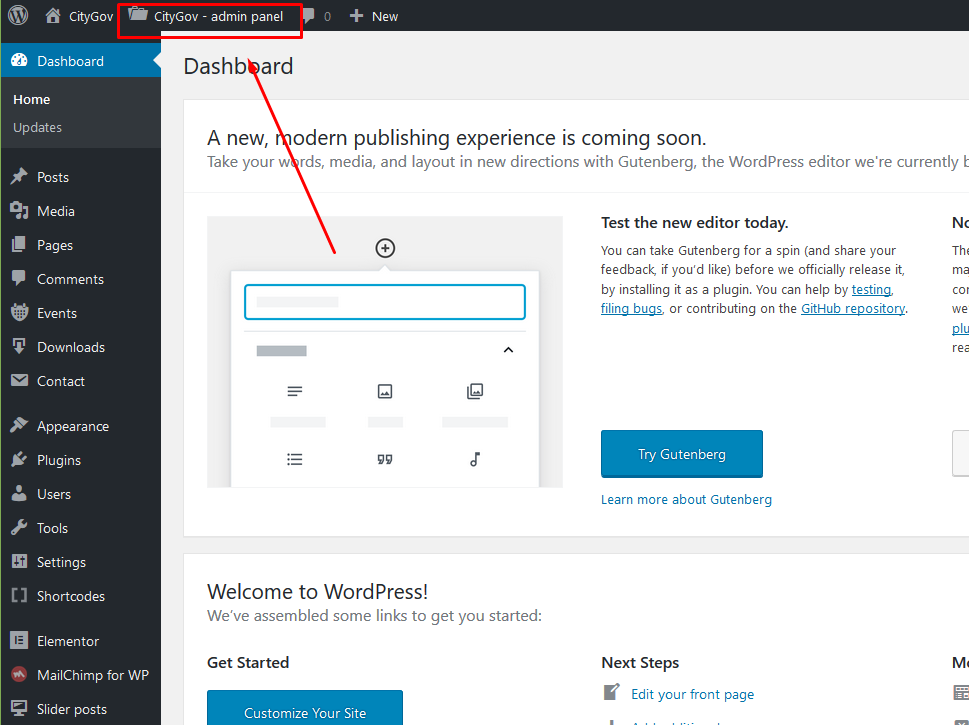
- Refresh admin page and 'CityGov - admin panel' button will appear;
- Go to CityGov - admin panel (theme options) and setup theme.
Installation via FTP:
- Unzip/extract the main (downloaded) theme package / twice / to get theme folder ‘citygov’,
- Using FTP client (e.g. Filezilla) upload '
citygov' folder into 'themes' folder in your WordPress installation (YOUR_HOSTING_ROOT/YOUR_SUBDIRECTORY/wp-content/themes/), - Go to Appearance >Themes, find CityGov theme and activate theme,
- After theme activation go to Appearance > Install Plugins, and install and activate Redux Framework plugin!
- Refresh admin page and 'CityGov - admin panel' button will appear;
- Go to CityGov - admin panel (theme options) and setup theme.
You have to install and activate required plugins (Redux, Elementor and Eleslider). You can do this by visiting Appearance » Install Plugins inside wp dashboard.
Required Plugins
The following message may be visible after theme activation:
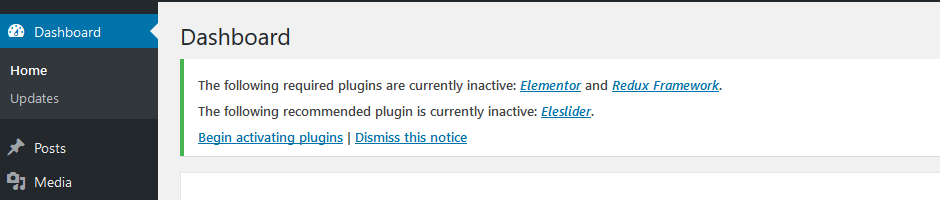
Go to Appearance » Install Plugins and install and activate following plugins:
- Redux Framework
- Elementor: after activation go to Elementor > Settings and make basic setup of the plugin:
 Save changes and that's it. You can edit any page in the page builder later.
Default Setup
1. After theme activation go to Appearance > Install Plugins, and install and activate Redux Framework plugin!
2. Then go to CityGov - admin panel
and hit "Save Changes" button to set default style settings:

You can change styling options later.
2. Following message may be visible after theme activation:
Click on 'Begin activating plugins' link and install and activate 'Redux Framework' (if not installed yet), Elementor and 'Shortcode Ultimate' plugins. Or you can do this by visiting Appearance » Install Plugins
4. IMPORTANT! It is possible that after theme activation are images wrongly cropped and look ugly! In this case use following plugin: http://wordpress.org/extend/plugins/regenerate-thumbnails/ to regenerate old thumbnails (from previous theme).
After plugin installation start regeneration in Tools > Regen. Thumbnails. This process can take a while and you cannot close tab/window until regeneration is done.
Homepage Setup
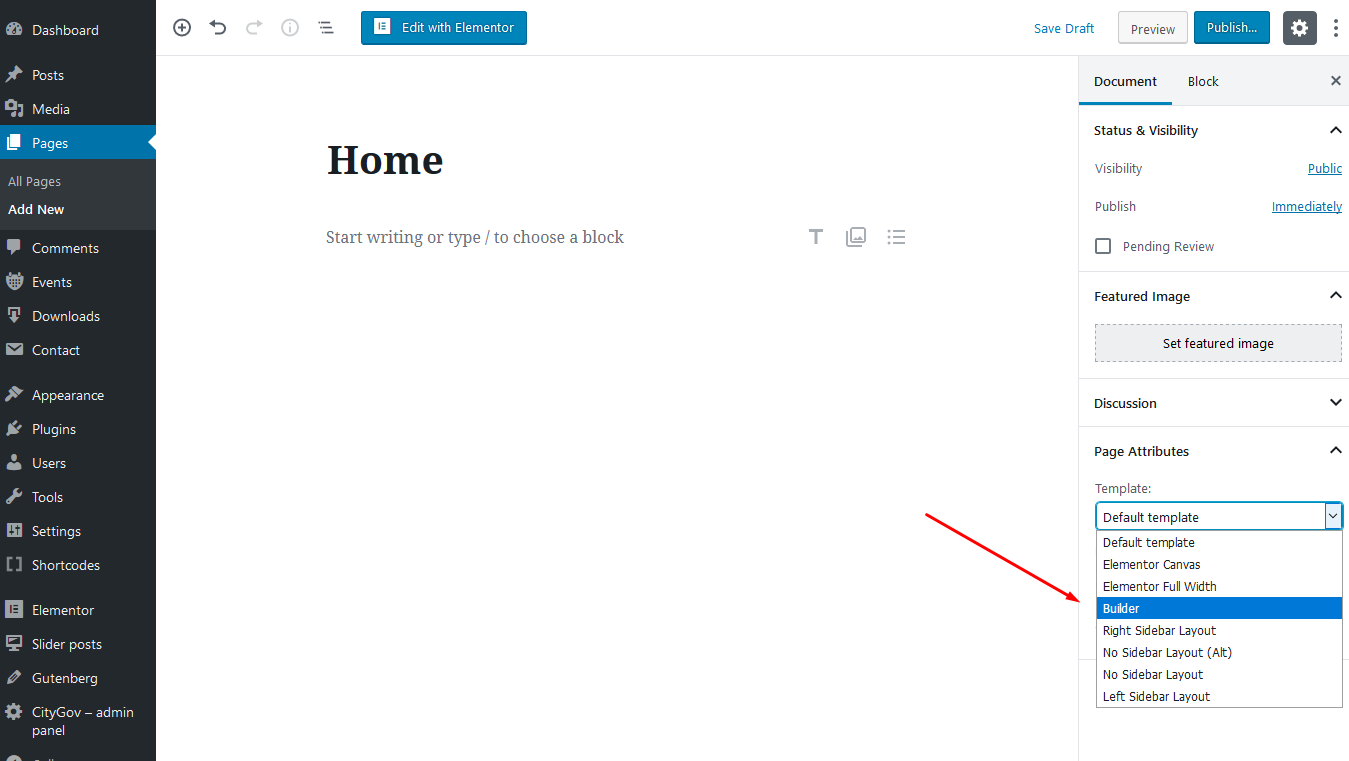
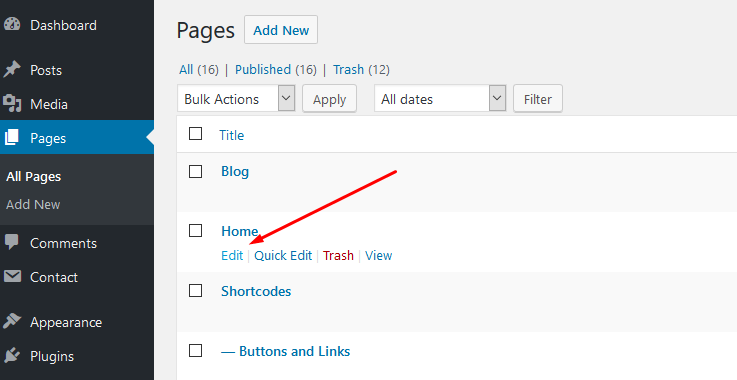
- In 'Pages' section create new page > name it 'Home'
- Select 'Builder' template for this page and save the page:
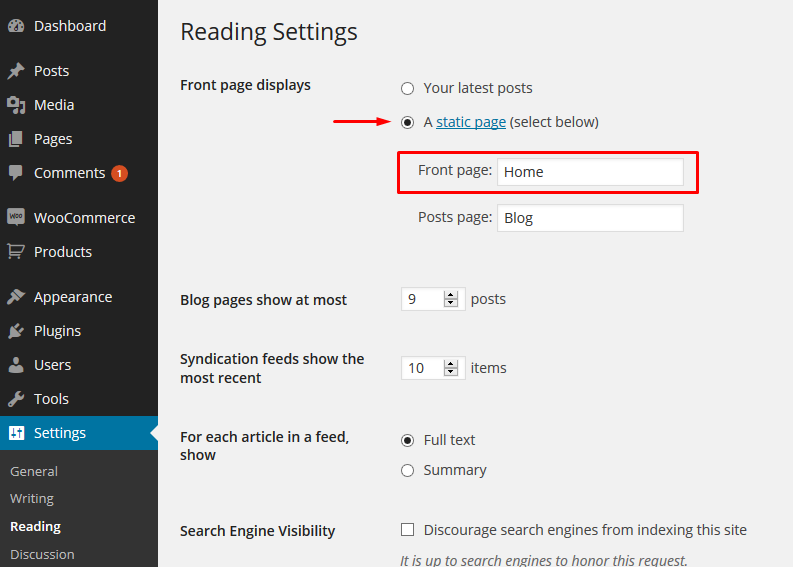
- Go to Settings > Reading and created 'Home' page set as Static page > Front page,
- Empty homepage is created now! In next steps, we'll create homepage content using 'Elementor' page builder.
Elementor
Important!
I recommend creating few classic blog posts and 'Slider posts' before you start creating templates in Elementor. Set 'featured images' for all your posts.
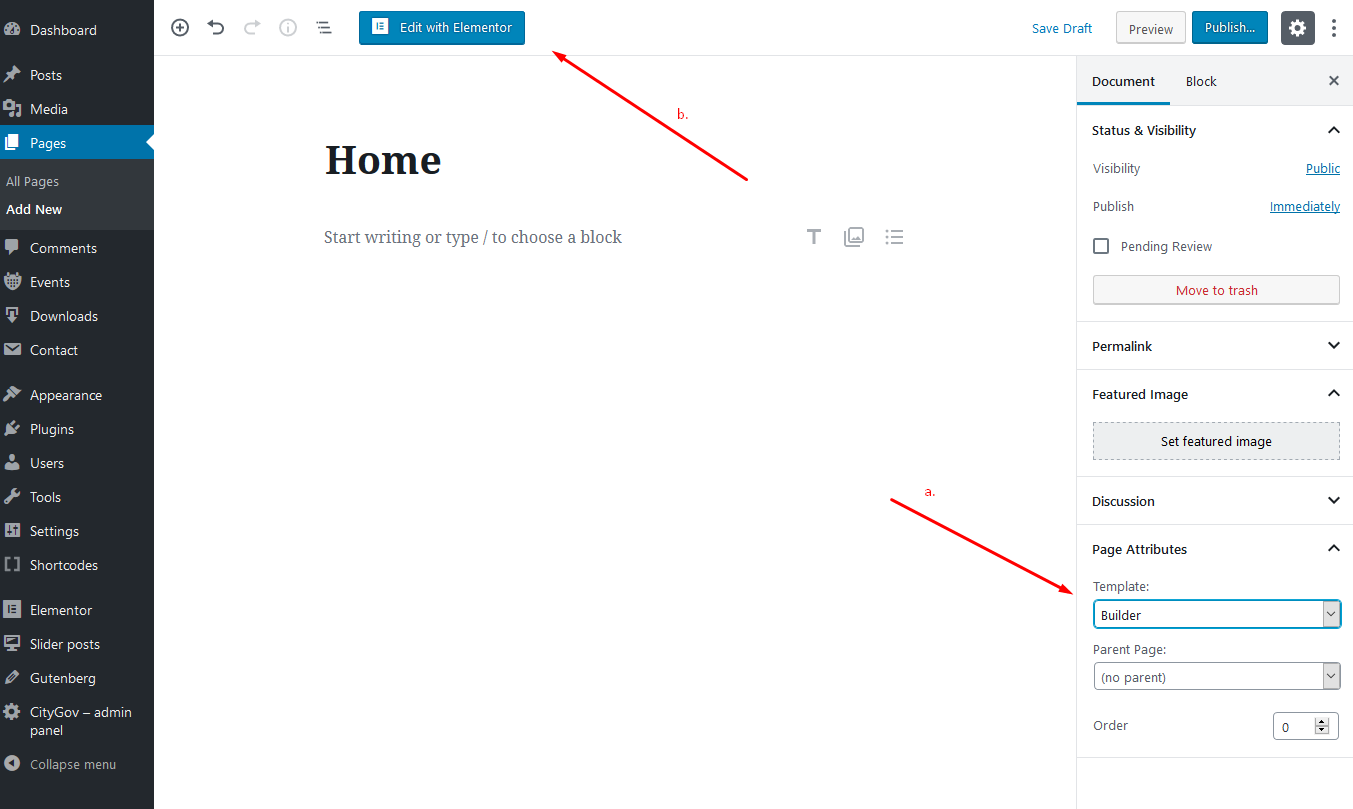
- Go to Pages section and edit 'Home' page, which we have created in previous steps:
- Make sure that 'Builder' template is selected for this page (a.), then hit 'Edit with Elementor' button (b.):
Adding Main Slider
- Make sure that Eleslider plugin is installed. Create few 'Slider' posts in left dashboard menu. (Slider posts types are similar / work similar to classic posts. Set post title, add slide content and set featured image for every slider post. One 'slider' post represents one slide in the slider. See more )
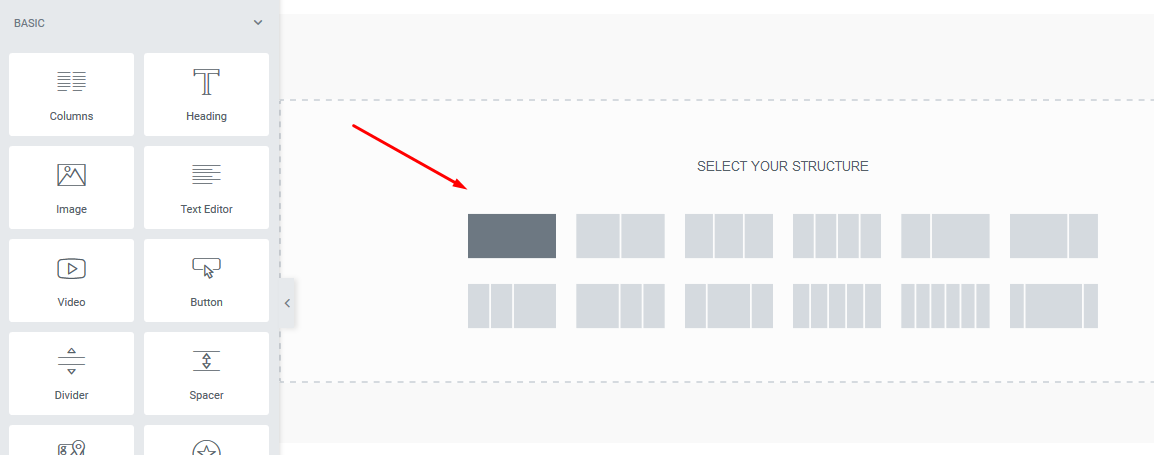
- In 'Elementor edit mode' hit on 'Add new section' button and add select 'one column' setion:
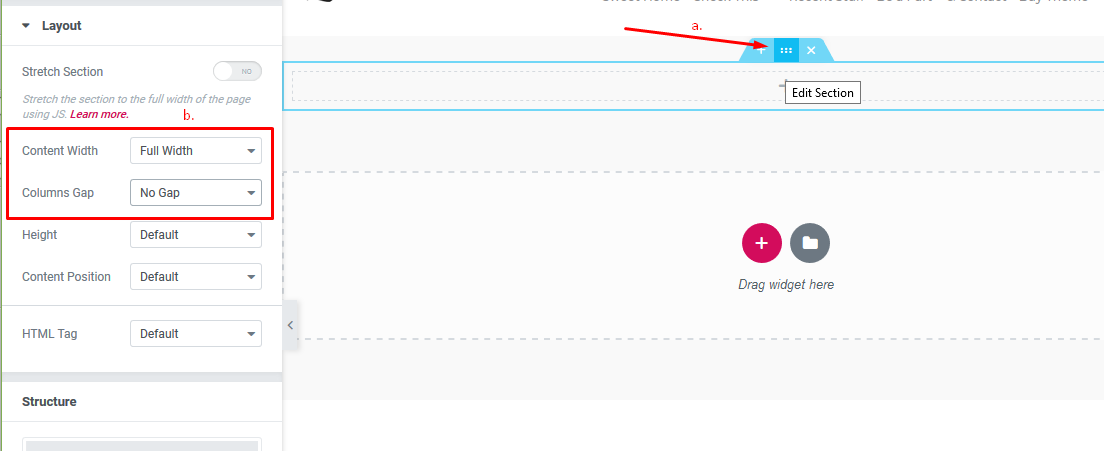
- Hover over the section and click on 2nd blue icon to edit section (a.) In left section select 'Full Width' and 'No Gap' options (b.)
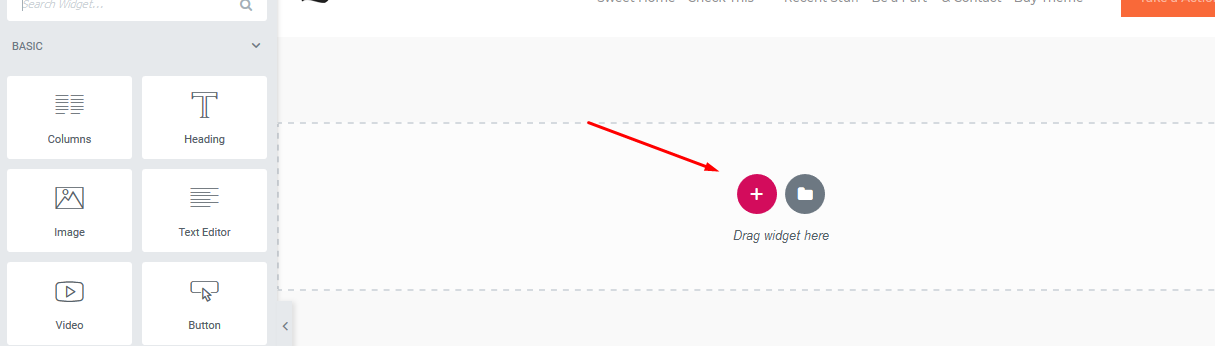
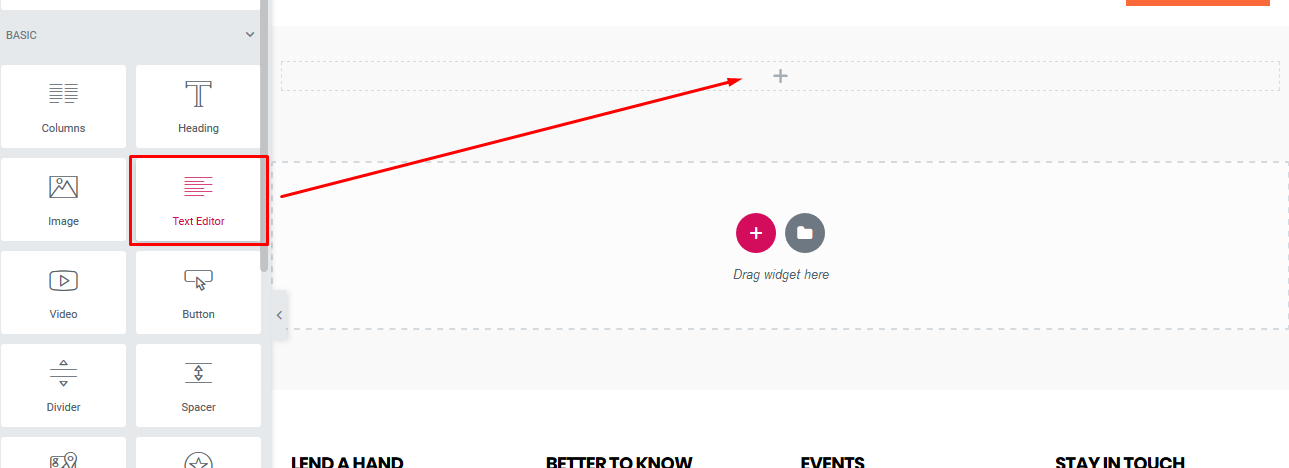
- Then just click + sign and drag 'Text Editor' block into setion.
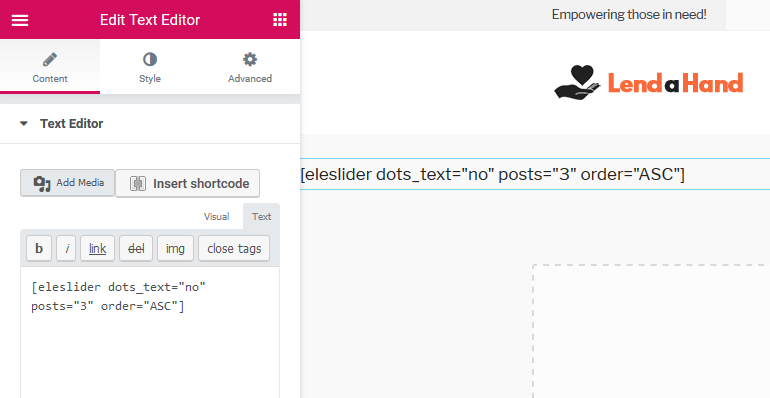
- Type [eleslider] shortcode into 'Text Editor' block; e.g.
[eleslider dots_text="no" posts="3" order="ASC"]
'Slider placeholder' will appear after save. On live homepage will be displayed fully functional slider.
Adding Hero image
- Add new section and add two column layout:
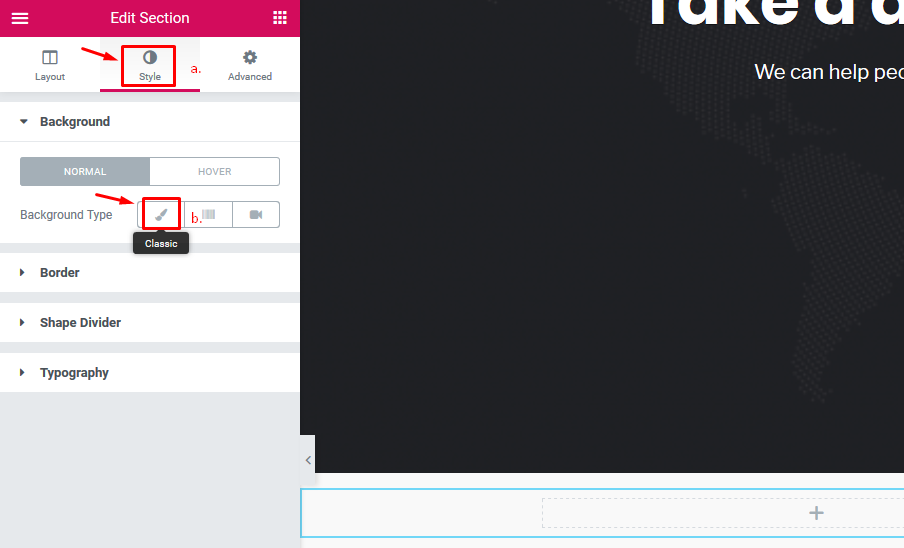
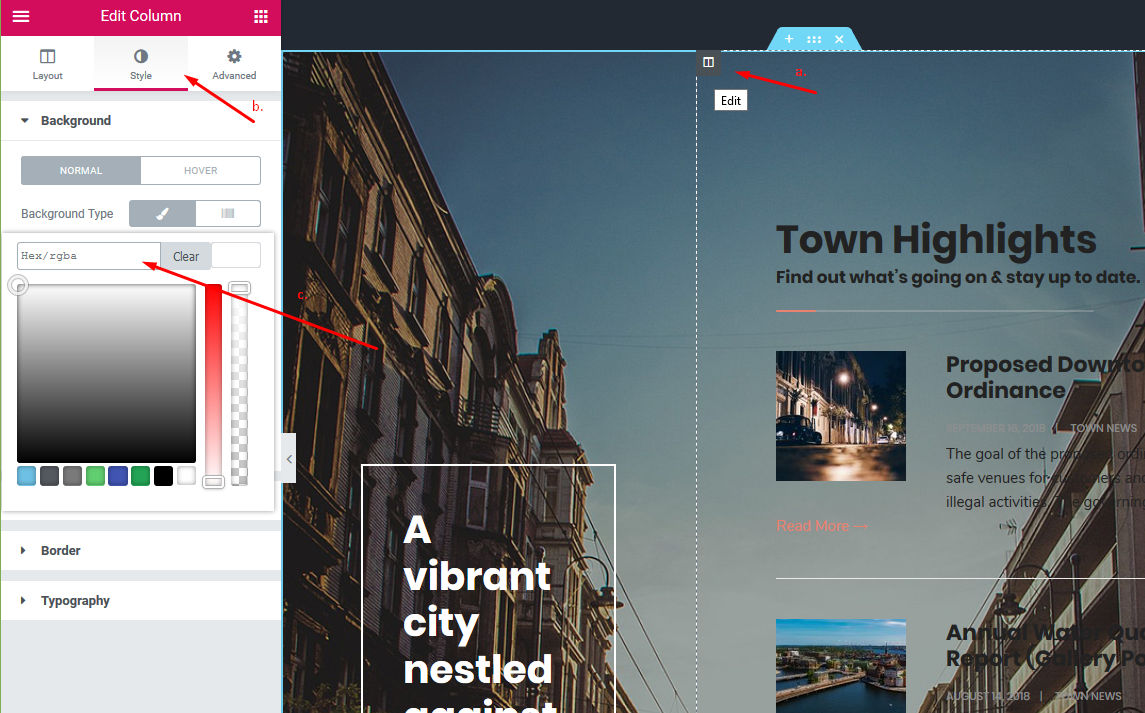
- Hover over the section and click on 2nd blue icon to edit section:

- Switch to the Style tab (a.) and add background image (b.)

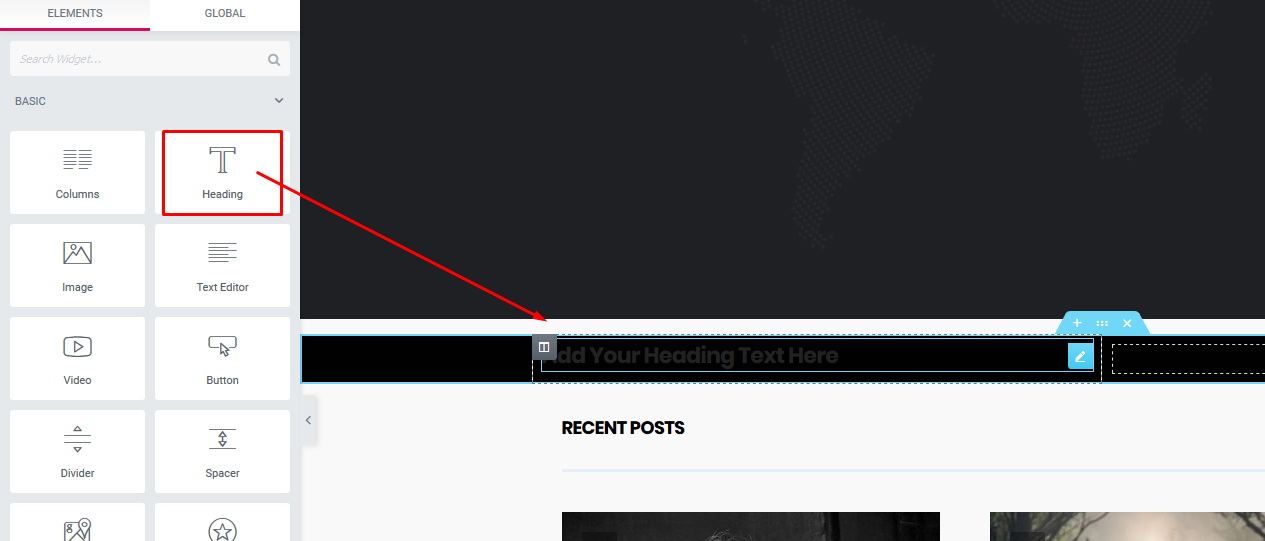
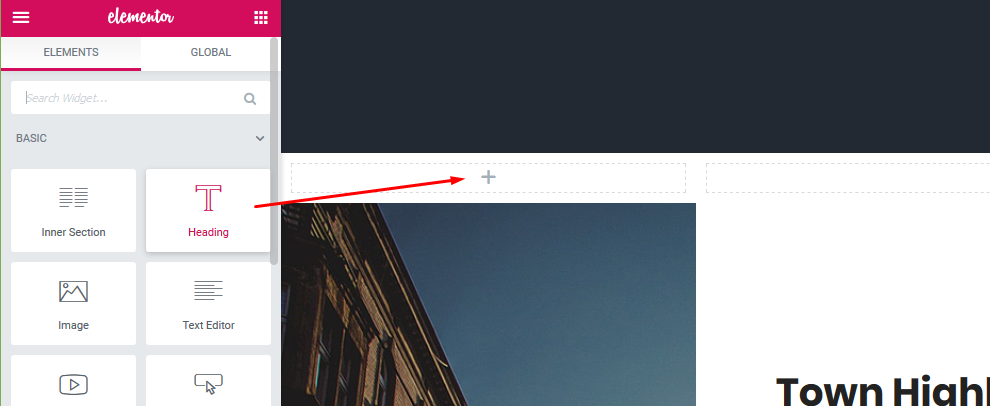
- Then just click on + sign in the left column and drag; e.g. Heading block into it.
 .
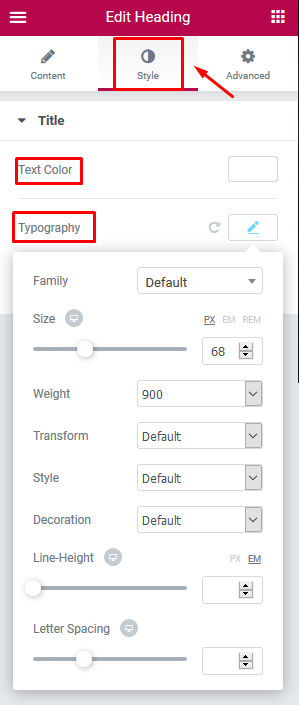
.
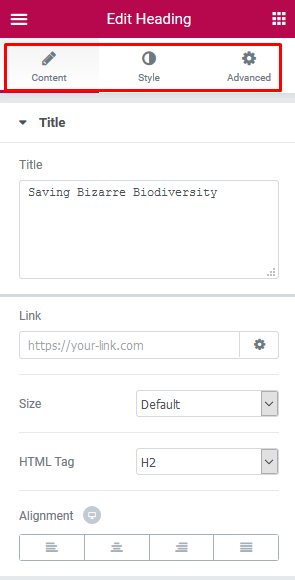
- Click on heading; and in Content / Style / Advanced tabs customize the appearance (size, text colors, font style, padding etc.).
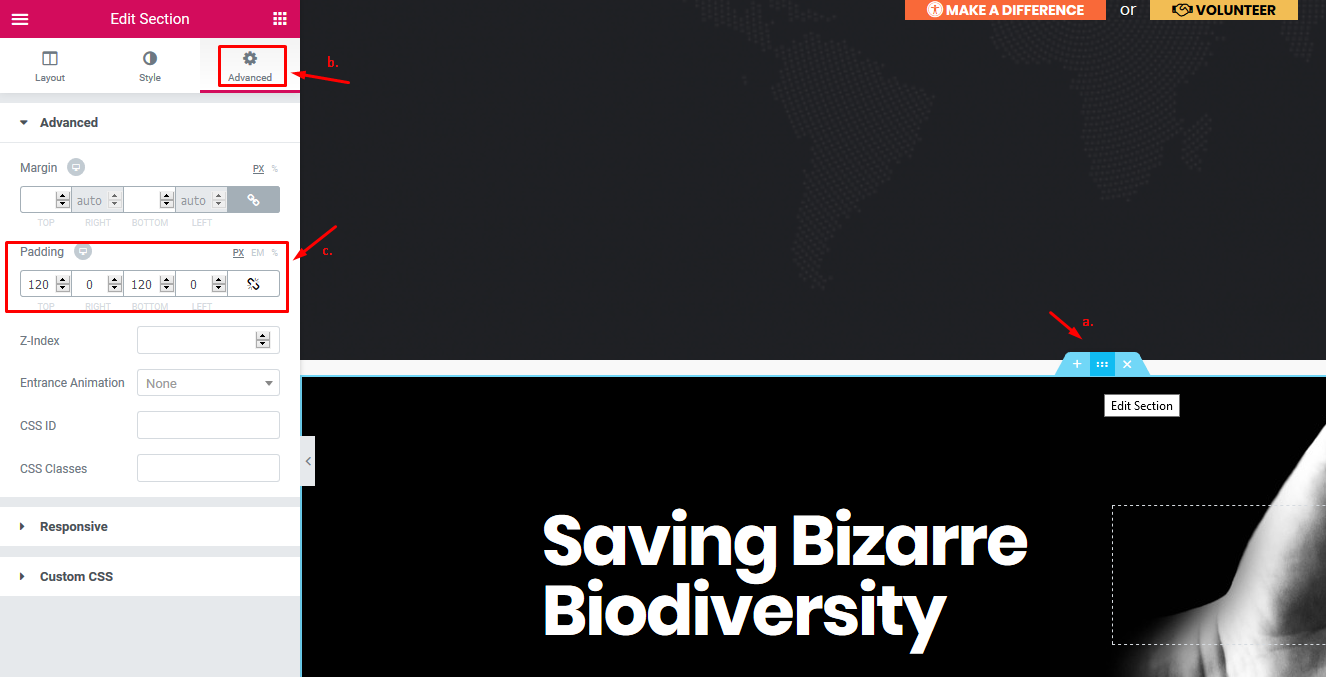
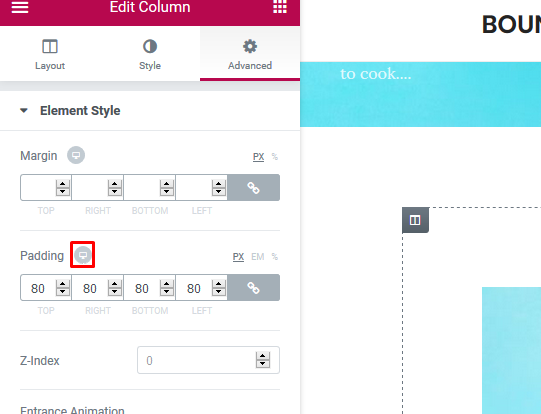
- After all these, adjust overall padding (spacing) of the 'hero' section.
a. edit section ,
b. switch to the Advanced tab,
c. adjust top and bottom padding of the section.
Adding Columns
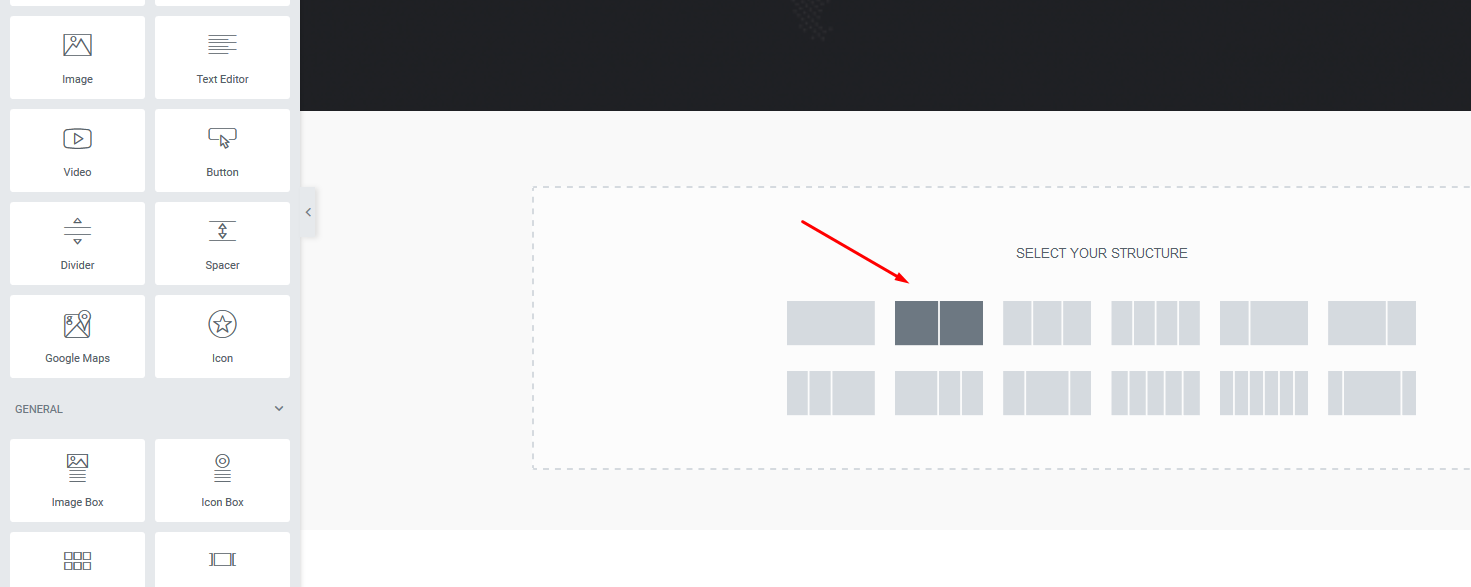
- In 'Elementor edit mode' hit on 'Add new section' button and select e.g. 'two columns' section:
- Using Drag&Drop resize columns to e.g. 60% (for wide column) and 40% (for narrow column):

- Click on the + sign in wide column and then drag blocks from the left menu; e.g. add 'Themnific: Blog List' block to this wide column:

- Adjust 'Number of posts' parameter and optionally select 'featured category' in left panel.
- Click on the + sign in narrow column, then drag Heading block from the left menu into it and type the text you want to. Edit styling of this heading (size, color, font, borders etc.).
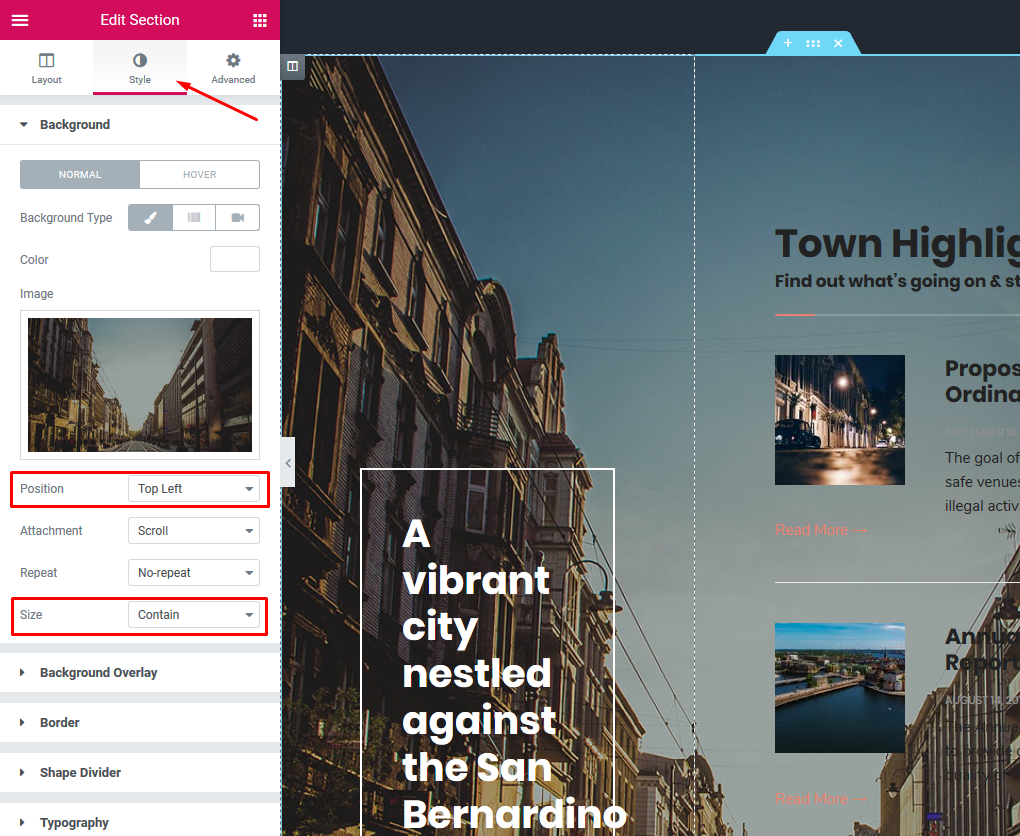
- Edit whole section ( 2nd blue icon) and set background image (choose vertical image). Set the 'Top Left' position and 'Contain' as the size:

- edit right column (a.) swith to 'Style' tab (b.) and add background color :
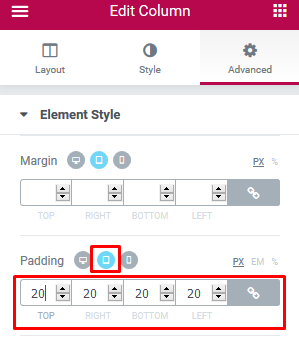
- Important!
Adjust padding for responsive mode! When you are building any layout using 'columns' in Elementor; click on small 'Desktop' icon in the Advanced tab; 'Tablet' and 'Mobile' icons will appear.
Then click on 'Tablet' and 'Mobile' icon and check your layout on small screens. If necessary, adjust padding/margin values for the responsive mode.
Blog Template
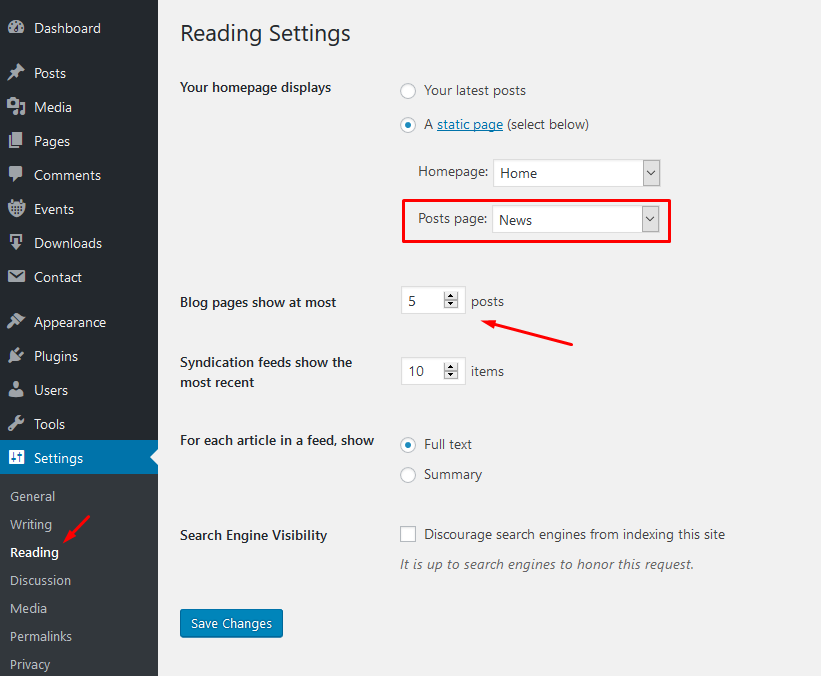
- If you want to create News (or Blog) page, create empty page (Default template),
- name it News (or Blog),
- go to Settings > Reading and set this page as 'Post page',
- adjust number of posts.
Theme Setup - Admin panel
Theme comes with extensive options panel with functions divided to these sections:
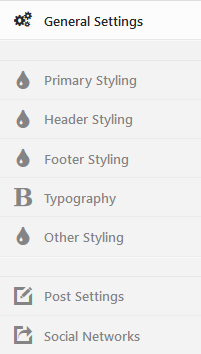
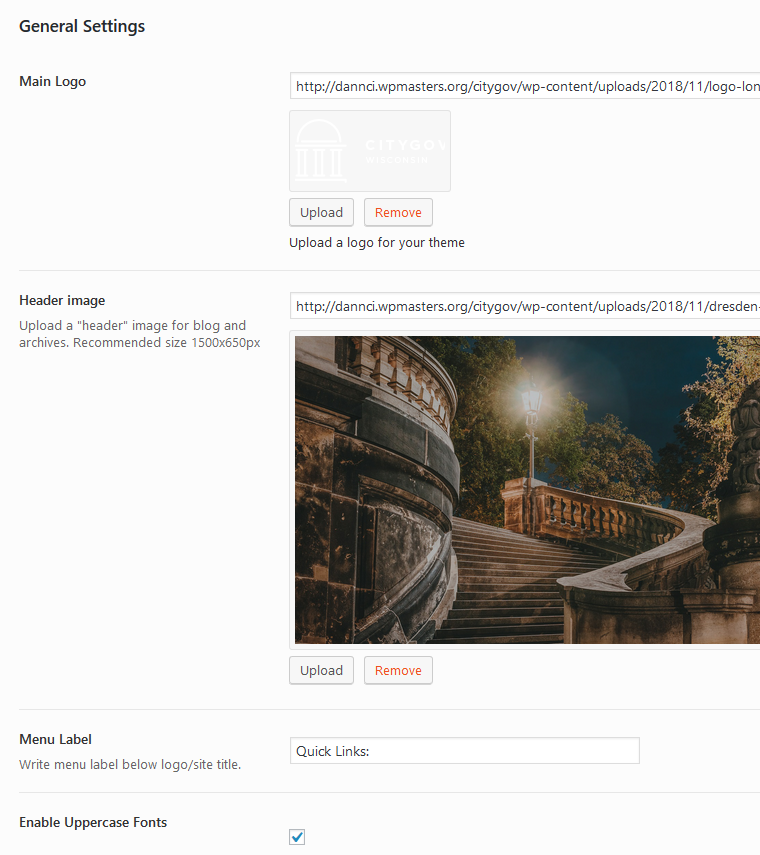
General Settings:
- Upload your Main logo image,
- Set header background image for blog and archives,
- Enable/disable 'Uppercase' fonts.
Primary styling:
- Select font family (with color, style and width) for main body text,
- Choose colors for typographic elements: body, wrapper, containers (ghost color), text/links, hover, borders etc.

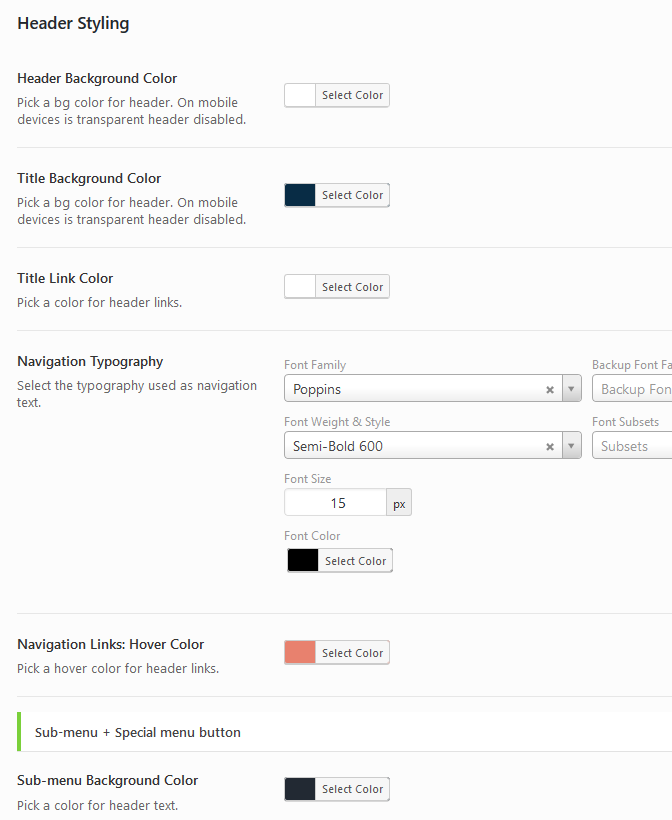
Header Styling & Settings:
- Setup color scheme (background, font, links and border colors) for header,
- Set other colors for header elements (sub-menus etc.),
- Set custom margins and width limitation for logo image.
Footer Styling:
- Select font family with color, style and weight for footer,
- Choose colors for typographic elements: footer background, text, links, hover, borders etc.,

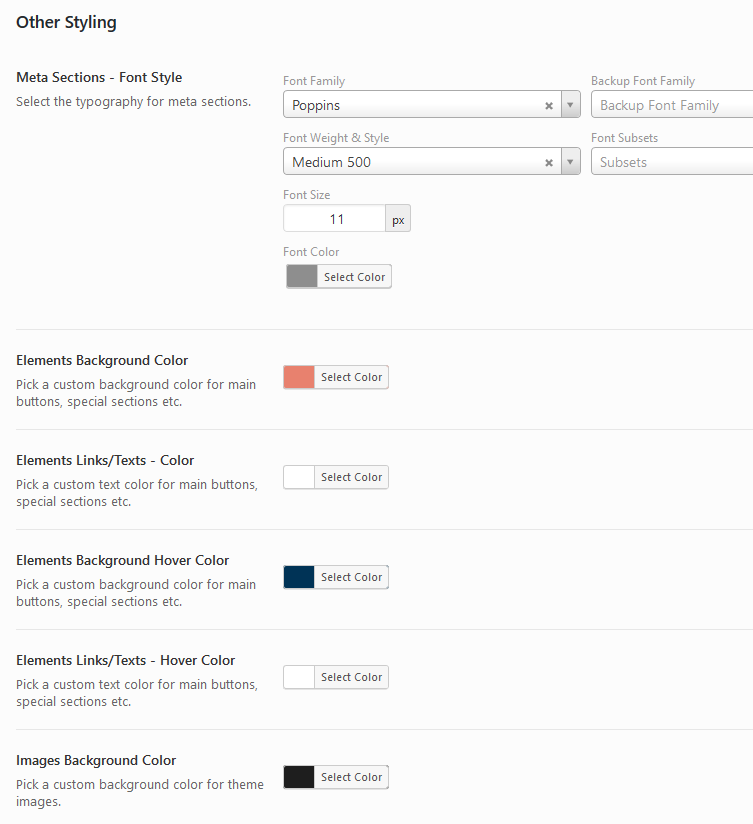
Other Styling:
- Set font styling for 'Meta' sections (date, category etc. post information)
- Choose background color for elements (buttons, lines etc.),
- Select text/link color for elements (buttons, lines etc.),
- Set color scheme for image backgrounds.
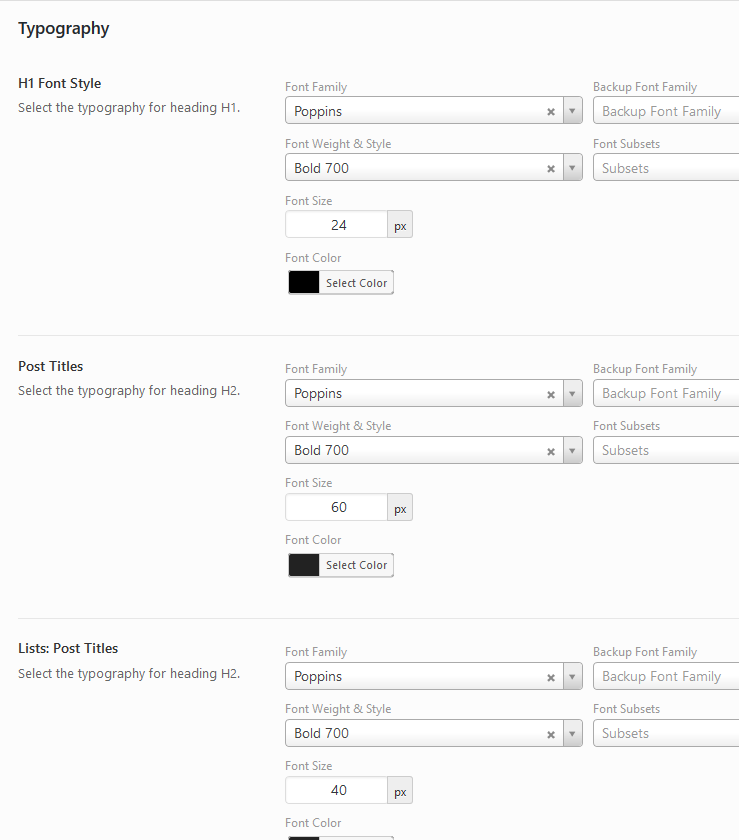
Headings Typography:
- Select Font-family for all headings (h1- h6) and 'post titles',
- Select font weight for all headings (h1- h6) and 'post titles',
- Select Font-size for all headings (h1- h6) and 'post titles',
- Select font color for all headings (h1- h6) and 'post titles',
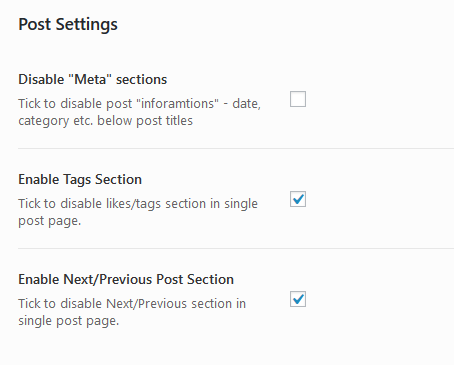
Post Settings:
- Turn On/Off partial post sections.
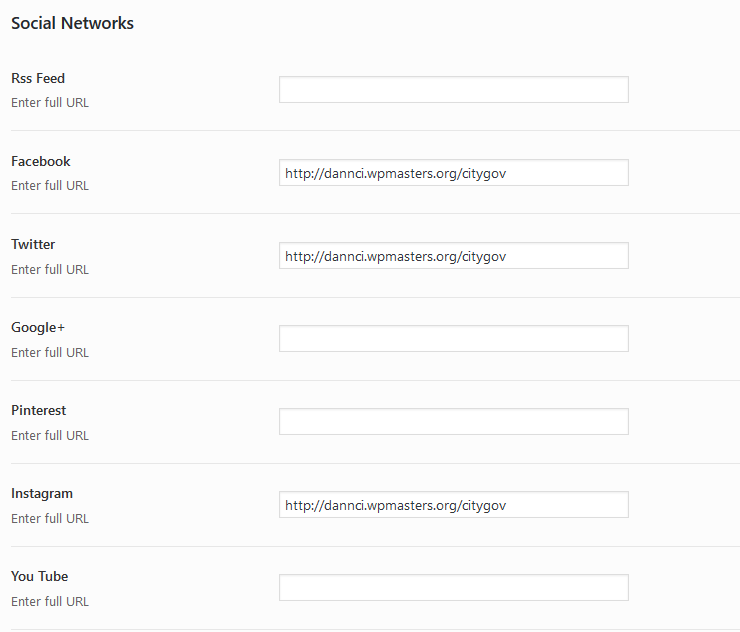
Social Networks Settings:
- Enable "Social Networks" section,
- Enter the full URL of social network, your profile or account (enter full URL: http:// or https:// including).
If you are finished click on "Save changes" button!
Custom Posts
Slider posts
CityGov theme (+ installed Eleslider plugin) comes with 'Slider' custom posts. Purpose is to create simple image slider:
You can access and create Slider custom posts in main dashboard menu:
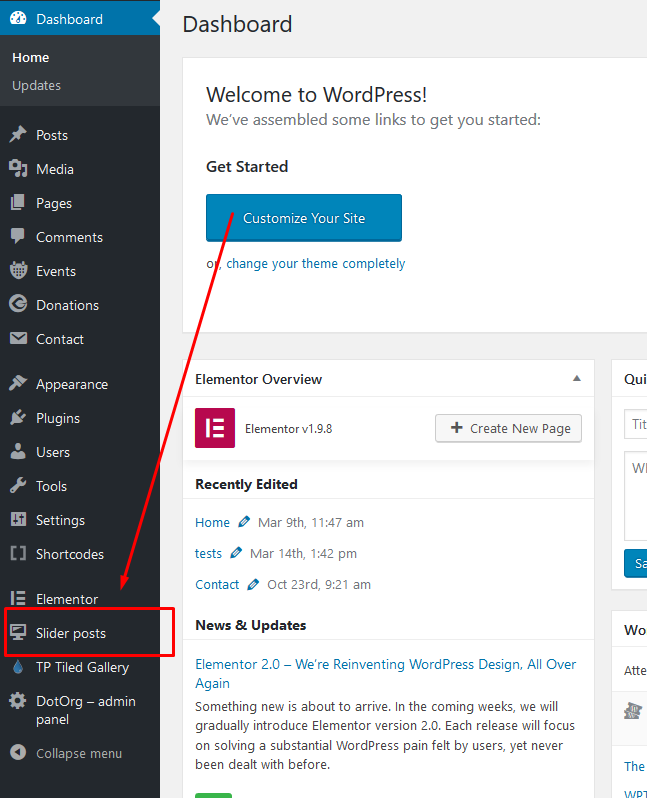
One 'Slider post' represents one slide in the slider.
Slider posts are similar / work similar to the classic posts. You can add slide content (headings, image, texts, button shortcodes etc.), set 'featured image' and sort/list these posts into own categories.
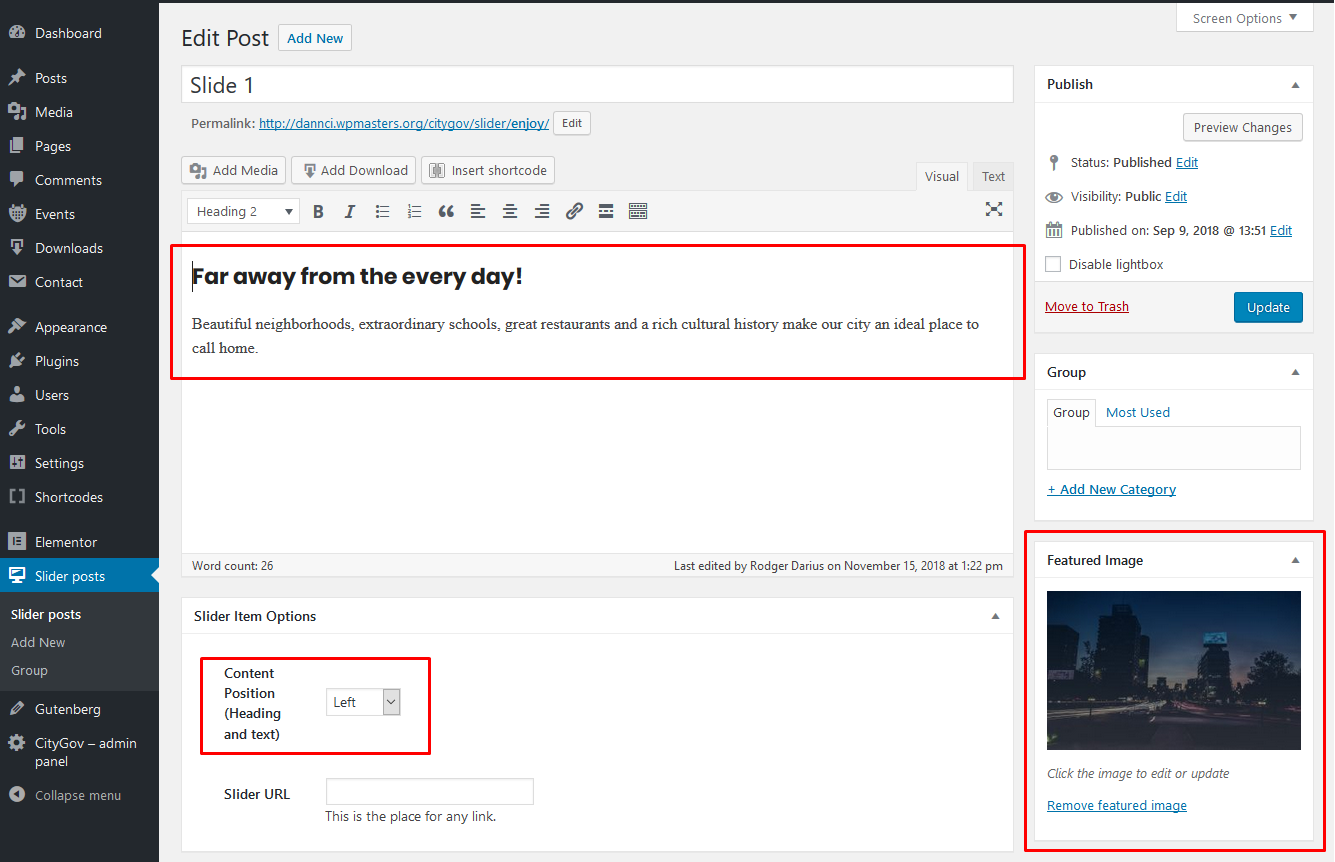
Display of the slider is very simple, in Elementor use [eleslider] shortcode in 'Text Editor' blockk in the 'full-width column'.
Custom Templates
- Create a page or a post.
- In Page Attributes (Post Attributes) section select custom template ('No Sidebar layout', 'Right Sidebar Layout' etc.)
- Click the Publish button to publish your page/post.
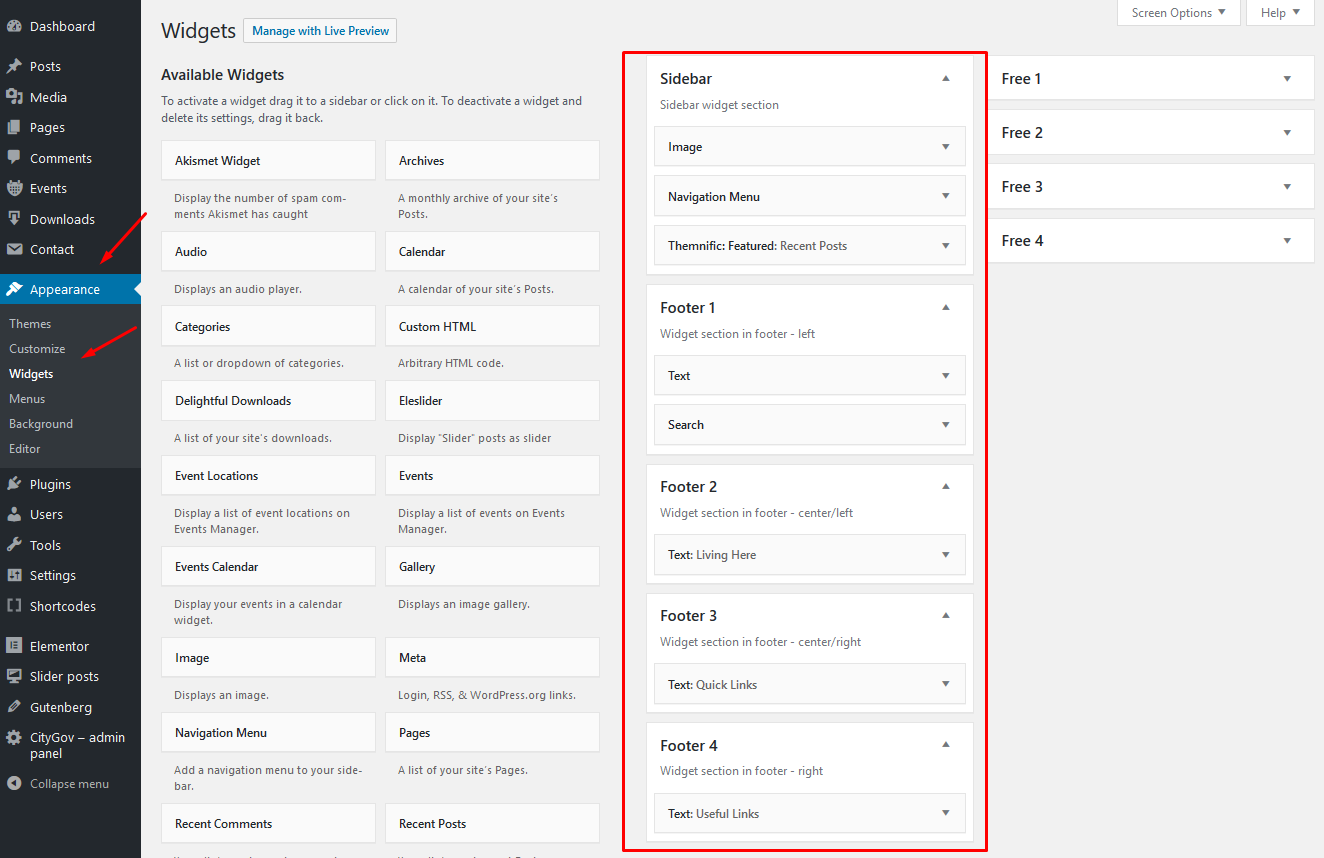
Custom Widgets
Theme comes with few custom widgets (marked as Themnific).
Go to Appearance > Widgets and setup your sidebar and footer widget areas. Widgets are very easy to setup.
Following widgets are used in theme demo:
In theme demo may be used custom widgets which come with 3dr party plugins (Events, Donations, Newsletter etc.).
Please see 'Plugins' chapter for more info about these plugins.
Images
IMPORTANT! It is possible that after theme activation are images wrongly cropped and look ugly!
In this case use this plugin: http://wordpress.org/extend/plugins/regenerate-thumbnails/ to regenerate old thumbnails from previous theme.
After plugin installation start regeneration in Tools > Regen. Thumbnails This process can take a while and you cannot close tab/window until regeneration is done.
Images and thumbnails are generated automatically.
To display thumbnails correctly upload images via WP interface using "Set featured image" button.
After image upload set featured image.
Featured Images - Minimal Sizes
- Main Slider section: 1920x900px;
- Blog template (Small images): 250x250px;
- Single post (as "Header backgorund"): 1500x650px;
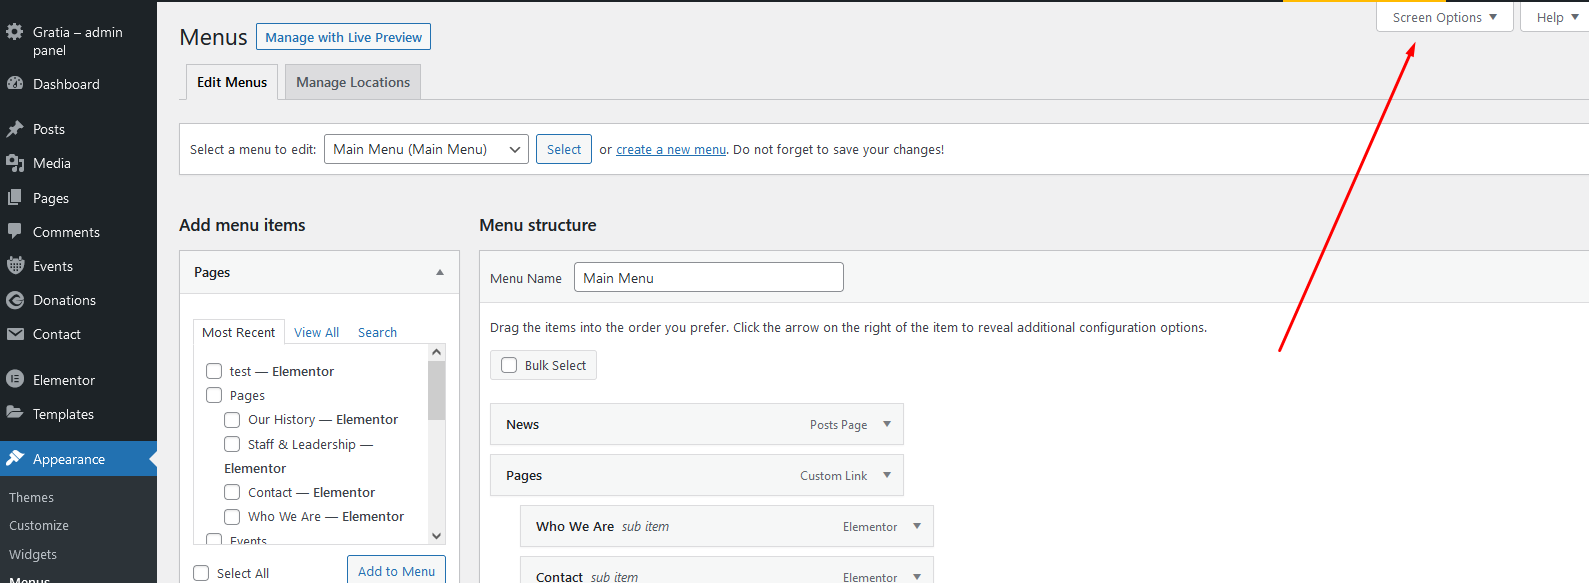
Custom Menu :
! Create own custom menus first! Please see following tutorial !
Colored Menu Item (on the right)
1. Toggle 'Screen Options' on the top of the menu screen:
2. Enable 'CSS Classes' and 'Desription' option:

3. Toggle any menu item and type special word into 'CSS Classes' field
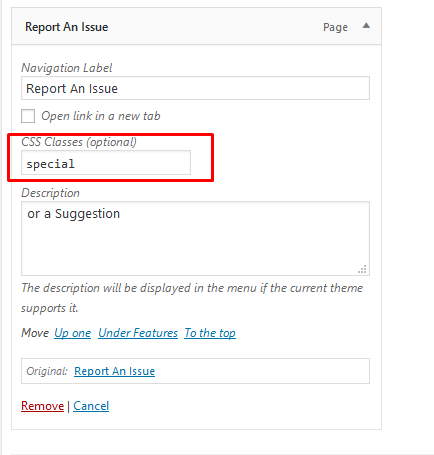
Menu Item Description
Toggle any menu item and type some text word into 'Description' field (see previous steps if the field is not visible/enabled):
Mega menu
Toggle any menu item and type 'mega' word into 'CSS Classes' field (see previous steps if the field is not visible/enabled):
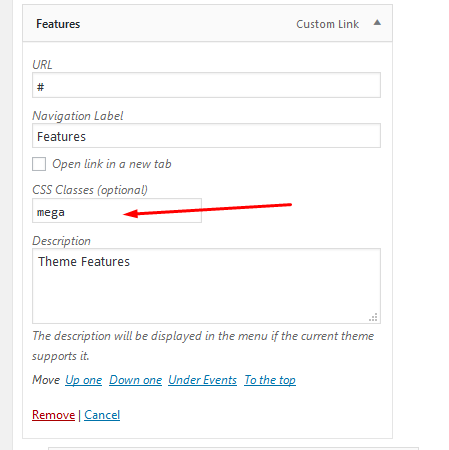
Then just add child menu items.

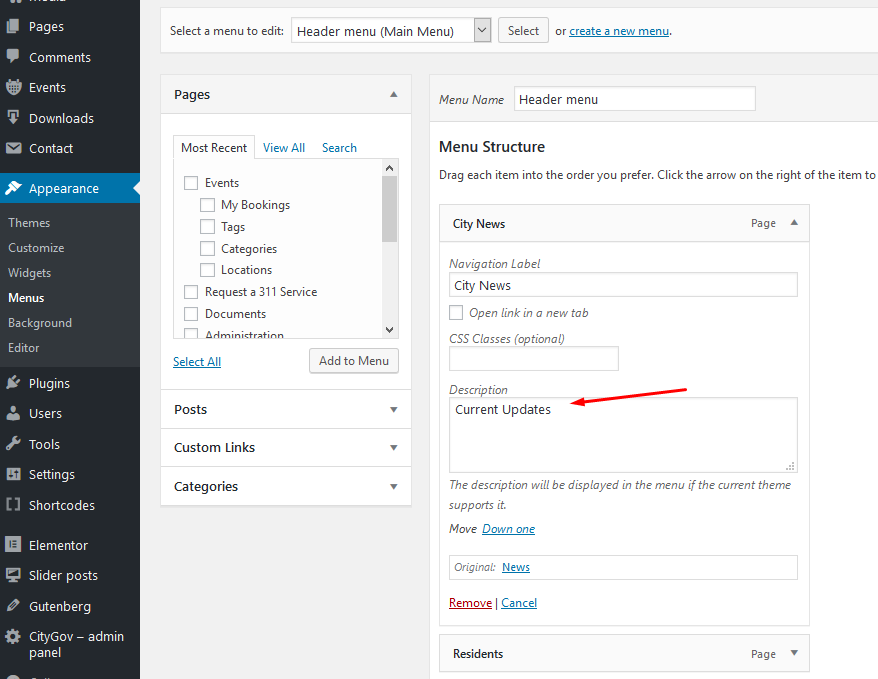
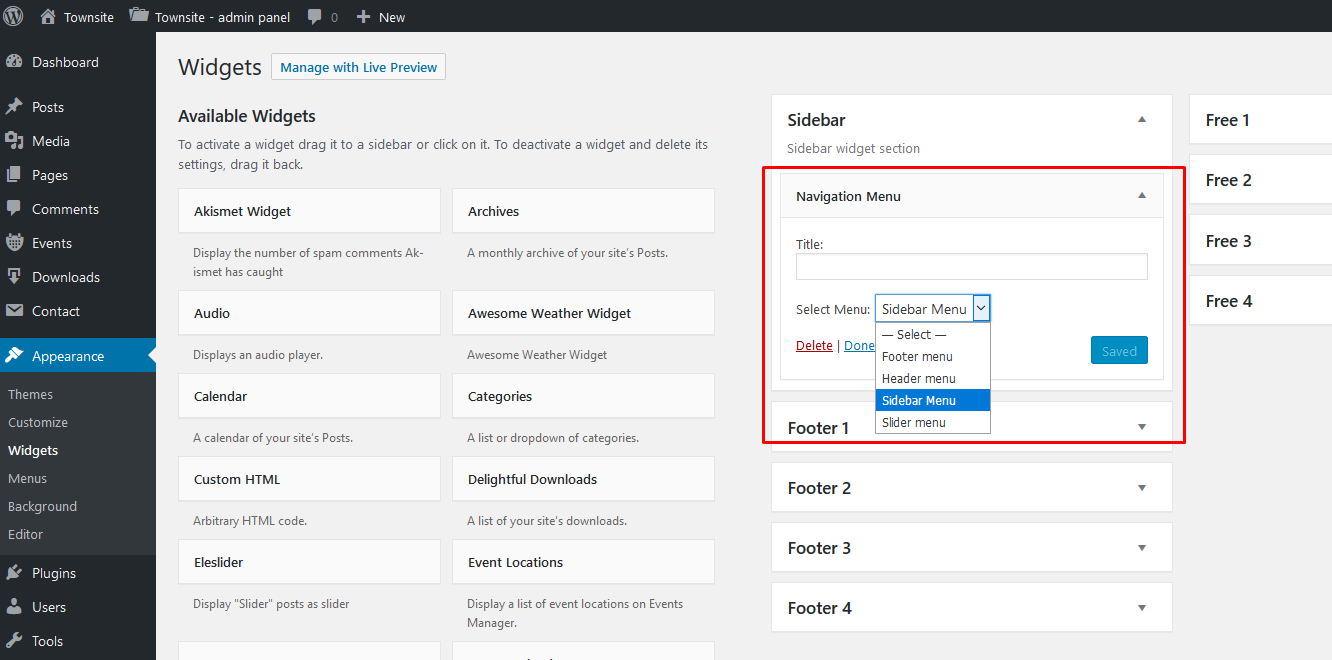
Sidebar menu

Create own custom menu in Appearance > Menus and then display this menu in any sidebar using 'Navigation Menu' widget:
Menu Icons
1. Before (or after) menu label add this piece of code
<i class="fa XXX"></i>
Enter full icon code - 'fa' class is required.
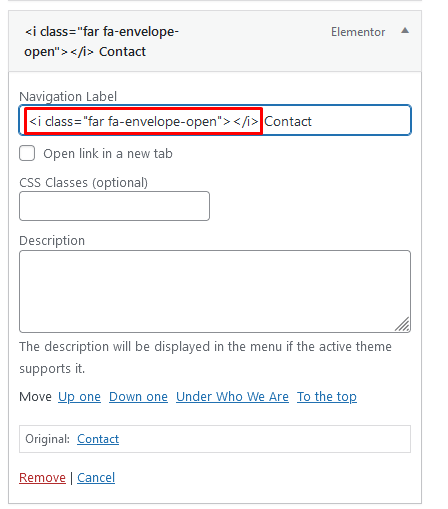
2. For XXX you can set any icon name. You can find all icon names on Font Awesome homepage.
3. You can see how-to video here. It is not tutorial for my theme but the process is the same.
Plugins
Elementor
Elementor plugin will help you create awesome layouts for your pages.
Go to Appearance » Install Plugins inside wp dashboard and install and activate Elementor plugin.
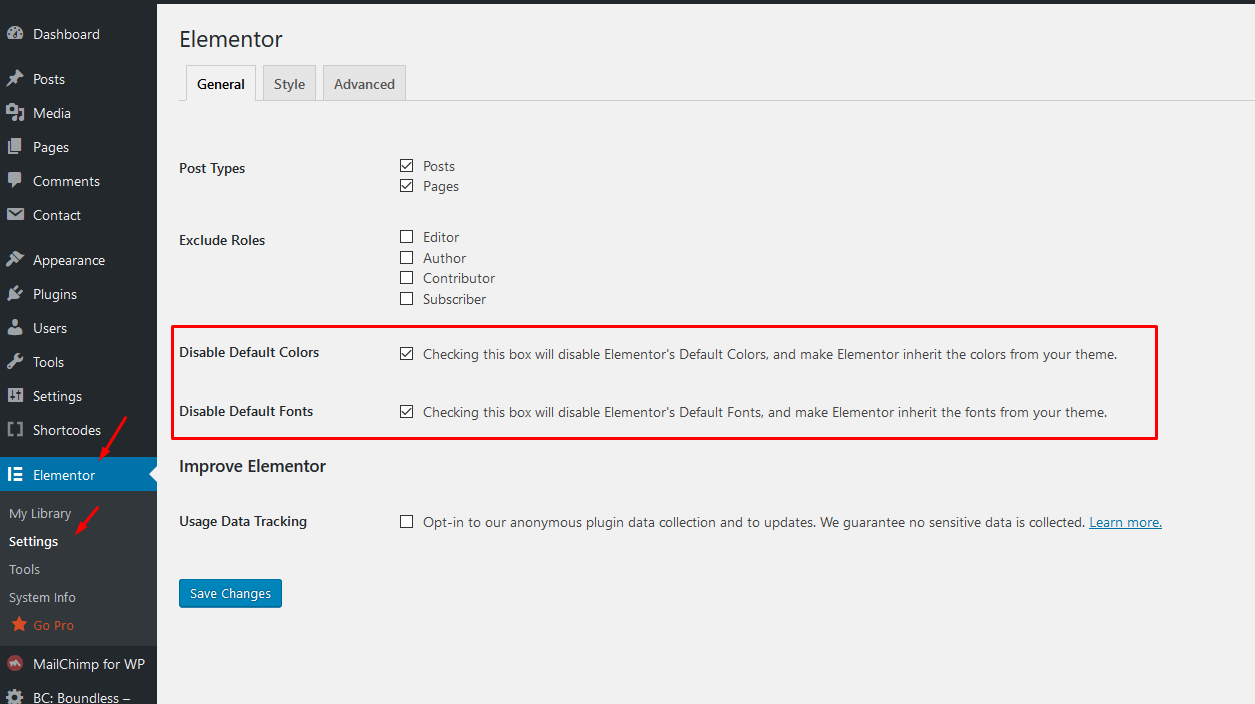
Basic setup of this plugin is very easy; go to Elementor > Settings and disable default color and fonts:
Save changes and that's it. You can edit any page in the page builder now.
Events Manager
Plugin page: Plugin Homepage
Into search field (in Plugins > Add New) insert 'Events Manager' and Install this plugin.
Events manager plugin is very complex and I recommend to check plugin documetation carefully! Please go through 'Getting Started Guide' to learn how to work with the plugin.
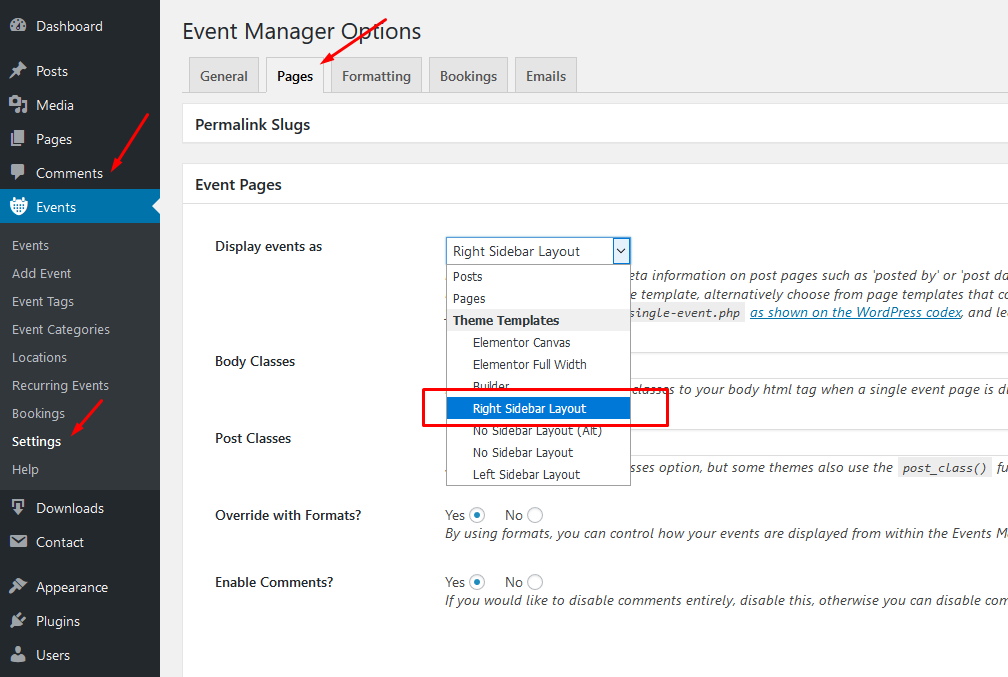
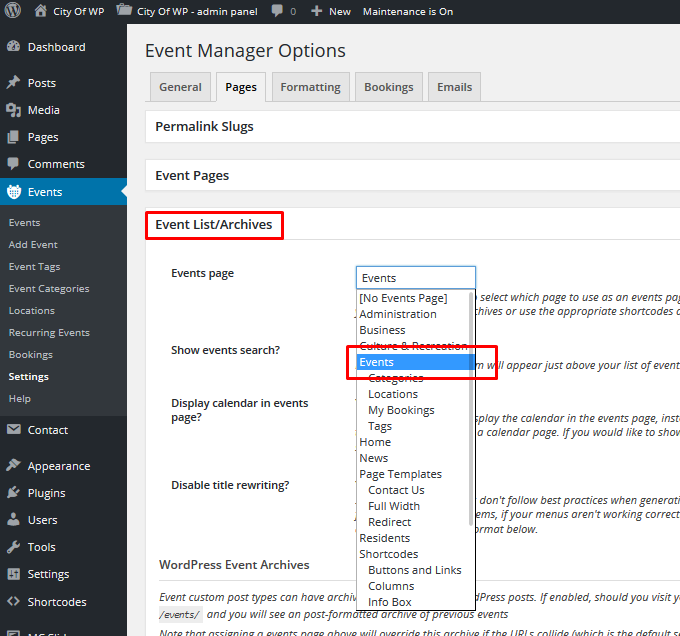
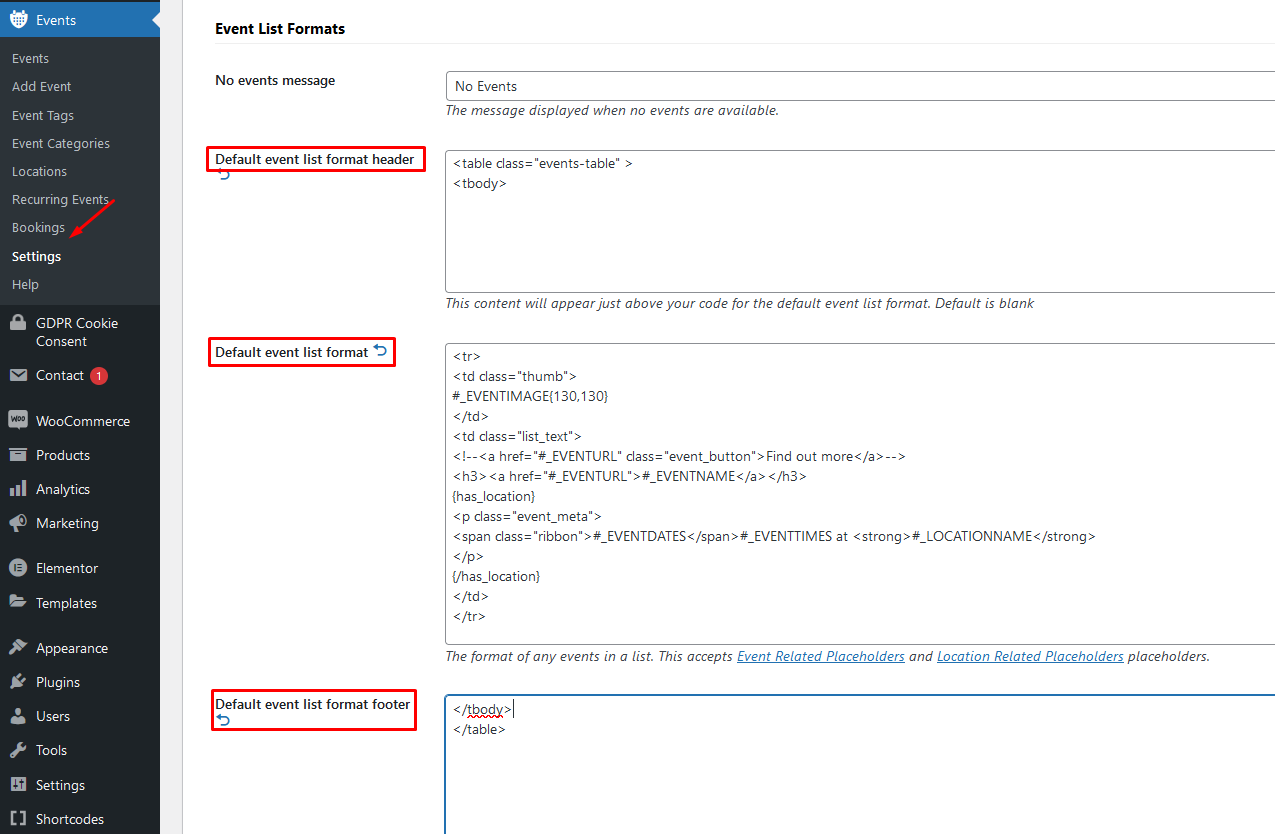
Theme related plugin settings:
a) In Events > Setting > Pages select 'Right Sidebar Layout' template for Event and Location pages
b) In Events > Setting > Pages in 'Event List/Archives' section select on which page will used as an events page:
c) In Events > Setting > Formating paste following code into 'Default event list format header' field:
<table class="events-table" >
<tbody>
and this code into 'Default event list format' field:
<tr>
<td class="thumb">
#_EVENTIMAGE{130,130}
</td>
<td class="list_text">
<a href="#_EVENTURL" class="event_button">Find out more</a>
<h3><a href="#_EVENTURL">#_EVENTNAME</a></h3>
{has_location}
<p class="event_meta">
<span class="ribbon">#_EVENTDATES</span>#_EVENTTIMES at <b>#_LOCATIONNAME</b>
</p>
{/has_location}
</td>
</tr>
close the table markup in the 'Default event list format footer'
</tbody>
</table>
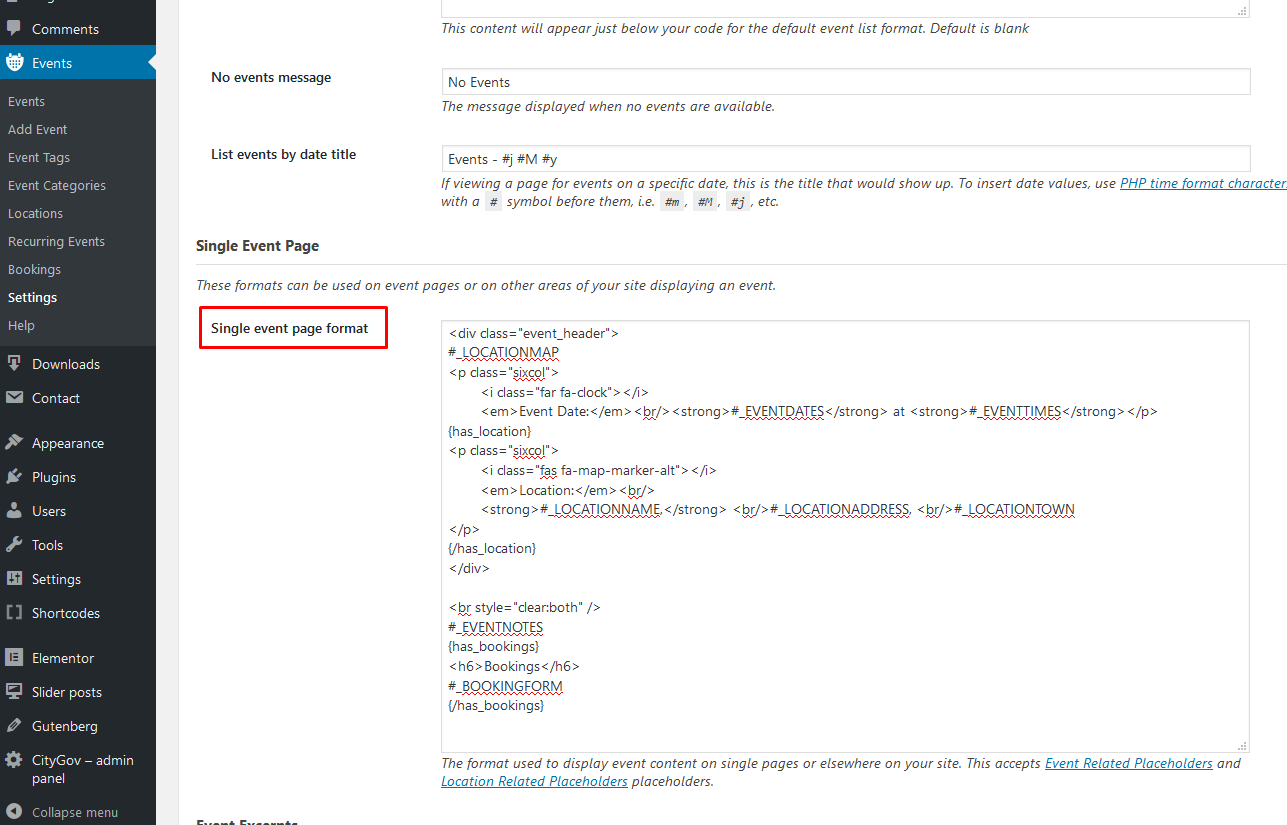
d) In Events > Setting > Formating > Single Event Page paste following code into 'Single event page format' field:
<div class="event_header">
#_LOCATIONMAP
<p class="sixcol">
	<i class="far fa-clock"></i>
	<em>Event Date:</em><br/><strong>#_EVENTDATES</strong> at <strong>#_EVENTTIMES</strong></p>
{has_location}
<p class="sixcol">
	<i class="fas fa-map-marker-alt"></i>
	<em>Location:</em><br/>
	<strong>#_LOCATIONNAME,</strong> <br/>#_LOCATIONADDRESS, <br/>#_LOCATIONTOWN
</p>
{/has_location}
</div>
<br style="clear:both" />
        #_EVENTNOTES
        {has_bookings}
        <h4>Bookings</h4>
        #_BOOKINGFORM
        {/has_bookings}
For the date use M d as format:

Give
Creating Campaigns and Donation Forms with GiveWP (Version 4+)
GiveWP 4+ introduces a new structure that separates Campaigns from Donation Forms for easier management and storytelling.
Step 1: Create a Campaign
- In your WordPress dashboard go to:
GiveWP → Campaigns → Create Campaign - Enter the Campaign Title and Description (this will appear on the frontend).
- Upload a Featured Image – this will be used in campaign listings.
- Set a Goal Amount (target amount for your campaign).
- Hit Continue to create the campaign.
A campaign is like a donation landing page that can contain one or more donation forms.
Step 2: Create a Donation Form(s)
Each campaign needs at least one donation form for processing payments. The donation form will be created automatically. But you can create a new one or edit the default one in GiveWP → Campaign → Forms

You can assign multiple forms to the same campaign (e.g. one-time + monthly giving forms).
Step 3: Create a Public Campaign Page Using Elementor
GiveWP automatically creates a frontend campaign page. It is located in 'Pages' section
- Go to Pages section
- Click Edit with Elementor

- Use the widgets located under the “GiveWP” section on the left side to create a landing page for your campaign:


Step 4: Display All Campaigns on a Page
- Create a page
- Set 'No Sidebar Layout' template for that page
- Click the “+” icon in the top left corner, then add the block GiveWP → Campaign Grid.
- Customize layout (grid, columns, goal progress, buttons)
- Publish

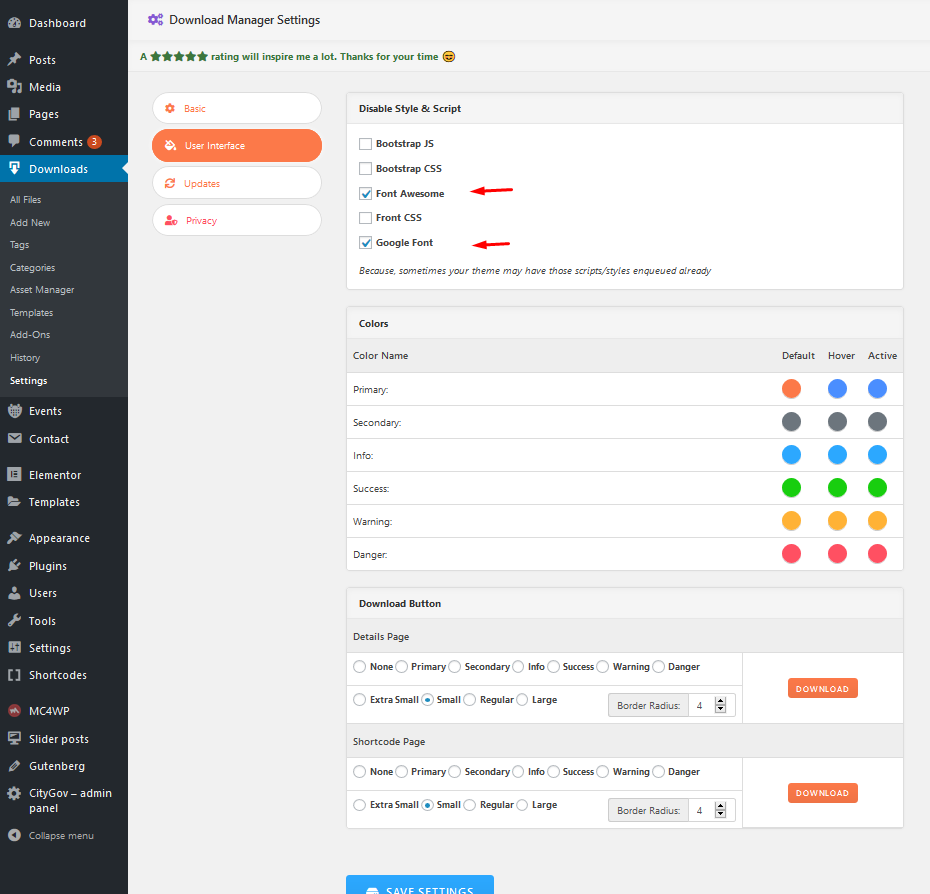
WordPress Download Manager
WordPress Download Manager is a super-awesome downloads manager for WordPress.
Into search field (in Plugins > Add New) paste WordPress Download Manager and Install this plugin. After installation/activation setup plugin in Downloads > Settings and save settings like this:
Add some files (downloads) and display these downloads on any page via shortcodes. You can organize downloads using e.g. [wpdm_category] shortcodes:
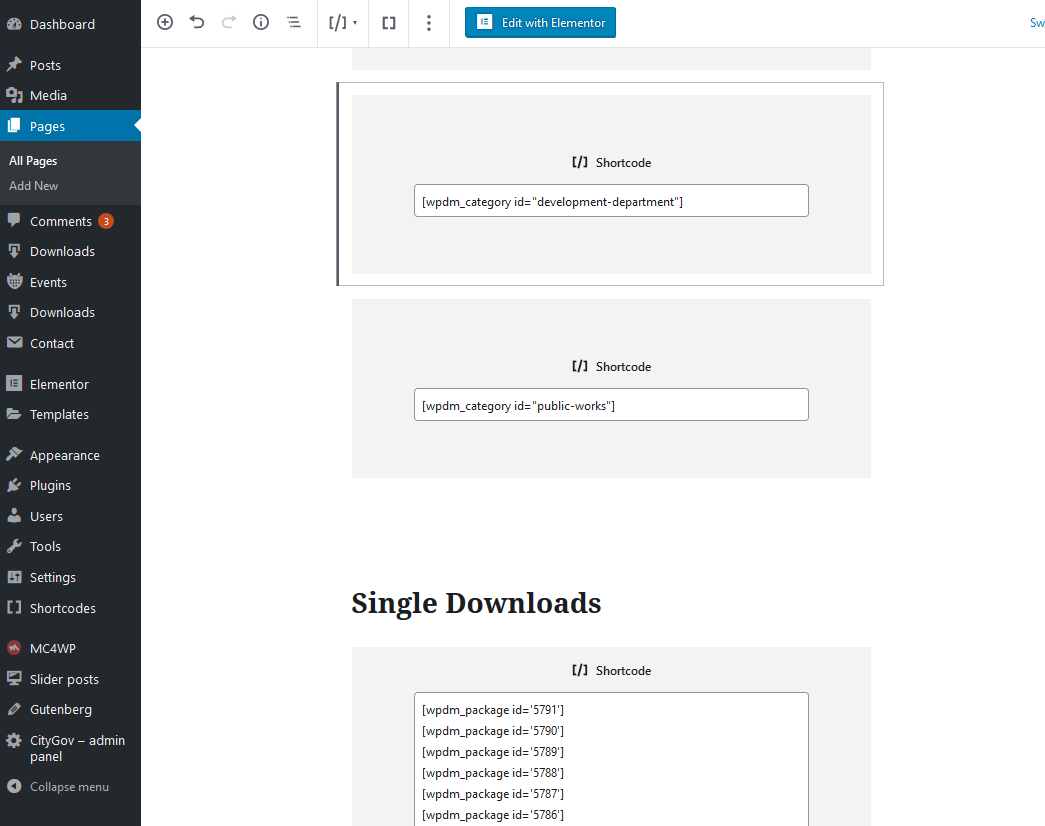
[wpdm_package id='XXX'] where XXX is the ID (number) of the file.
[wpdm_category id="development-department"] where 'development-department' is the ID download category.
MailChimp for WordPress
You can easily create newsletter subscribe form with 'MailChimp for WordPress' Plugin: Plugin Homepage
Into search field (in Plugins > Add New) paste MailChimp for WordPress and Install this plugin
Plugin can be set in MailChimp for WP section:
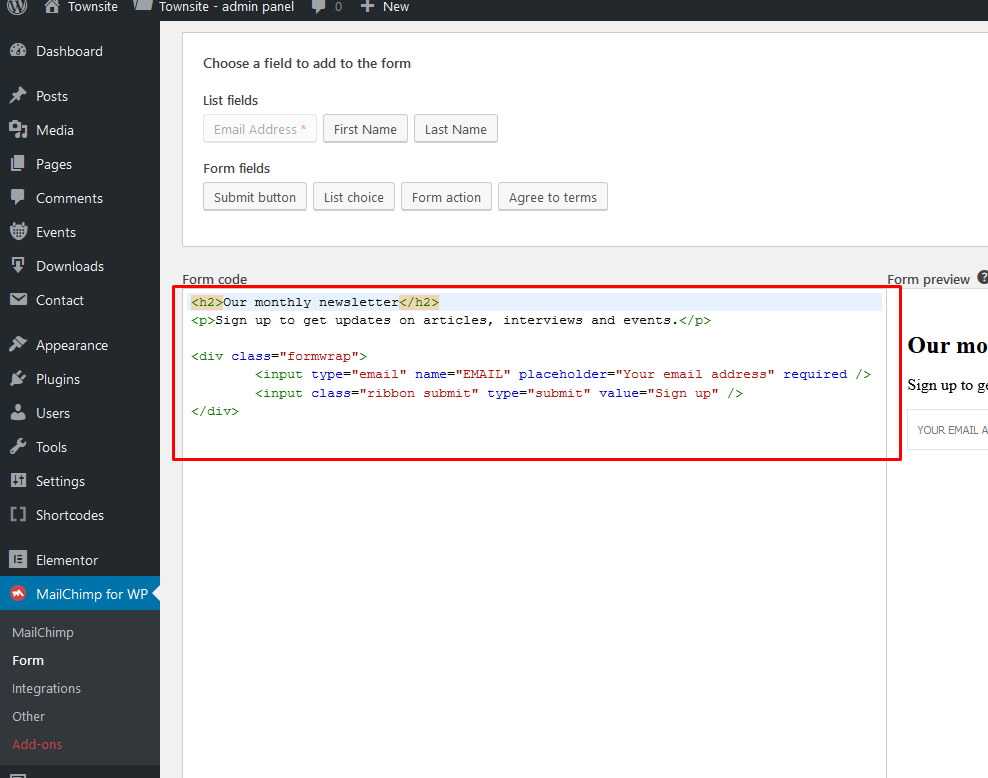
In demo is used subscribe form with following markup: https://pastebin.com/L2cFPYyP
Recent Tweets Widget
Theme is compatible with Recent Tweets Widget plugin. Plugin is used in demo site.
In search field (Plugins > Add New) insert 'Recent Tweets Widget' and Install plugin.
Plugin widget can be set in Appearance > Widegts:
Note!: You need to get "consumer and secret" codes for Recent Tweets Widget:
- Go to https://dev.twitter.com/apps/new and log in, if necessary
- Enter your Application Name, Description and your website address. You can leave the callback URL empty.
- Accept the TOS, and solve the CAPTCHA.
- Submit the form by clicking the Create your Twitter Application
- Copy the consumer key (API key) and consumer secret from the screen into widget fields
Shortcodes Ultimate
You can generate different shortcodes using 'Insert shortcode' button in all Post/Page screens:

AddToAny Share Buttons
Plugin page: Plugin Homepage
Into search field (in Plugins > Add New) insert 'AddToAny Share Buttons' and Install this plugin.
Plugin can be set in Settings > AddToAny:
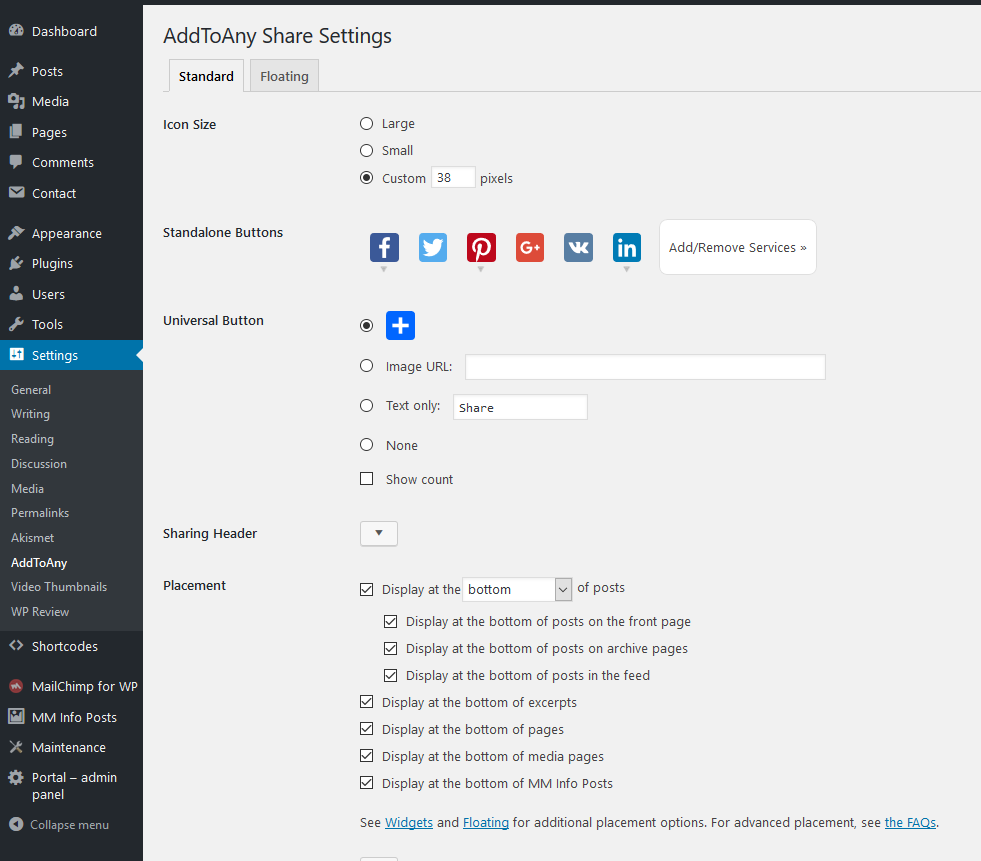
Theme is compatible with Simple Share Buttons Adder too.
Ajax Search Lite
Plugin page: Plugin Homepage.
Into search field (in Plugins > Add New) paste Ajax Search Lite and Install this plugin
Set up the plugin in 'Ajax Search Lite' options page:

The desing of the searchbar can be changed in 'Layout Options' tab.
Contact Form 7
Plugin page: Plugin Homepage
Into search field (in Plugins > Add New) insert 'Contact Form 7' and Install this plugin
You can create own contact form(s) in main wp menu > Contact.
You can display created 'contact form' on any page using shortcode. On demo page is used contact fore with following markup: https://pastebin.com/tL2M2PMQ
Please read plugin documentation for more info about this very flexible plugin.
Other Recommended Plugins
Autoptimize →
Smush →
WP-Members →
WP Featherlight →
Awesome Weather Widget →
Demo Import (XML file)
Make sure that CityGov theme and Elementor and Eleslider plugins are installed and activated before demo import.
If you want to import whole content (inc. events, downloads) activate Events Manager and WordPress Download Manager plugins too!
One Click Demo Import
Install and activate 'One Click Demo Import' plugin.
After that import full demo content easily in Appearance > Import Demo Data. 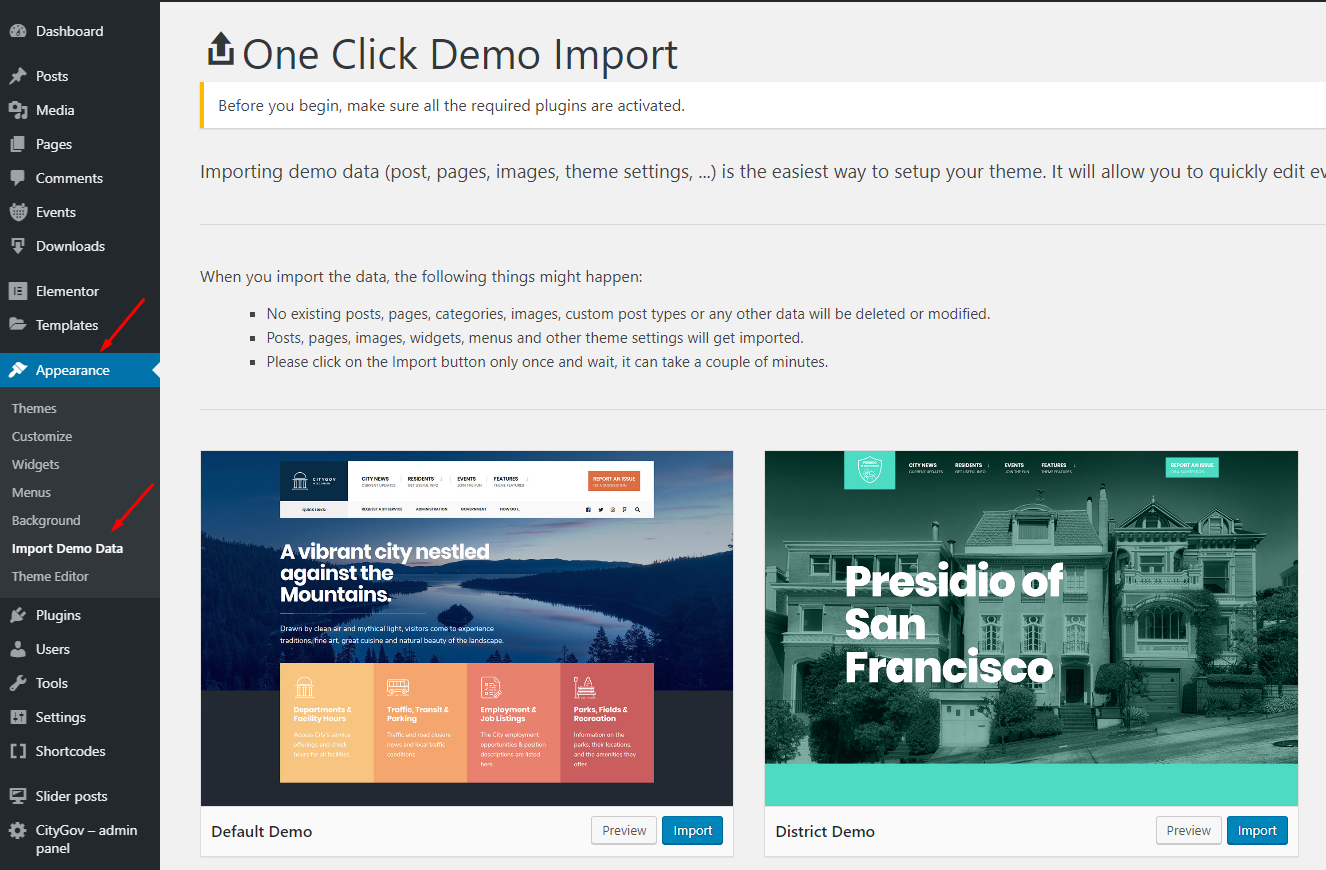
Choose demo you want to import and then just hit 'Import' button and wait until import is done (it can take few moments).
Elementor templates
If you don't want to import whole demo content you can import just elementor templates (e.g. layout of the homepage) using .json file.
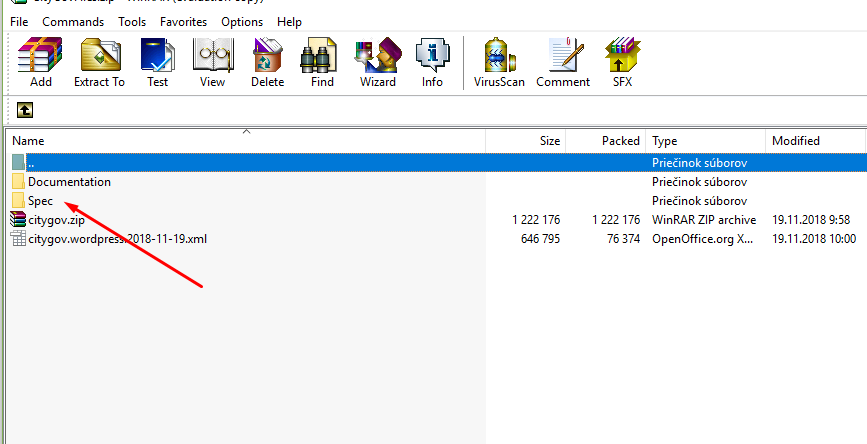
.json files are located in main theme package, in 'spec' folder. Extract .json files to you computer.
You can import template when you are editing any page in Elementor > click on 'Add Template' button > Import Template:
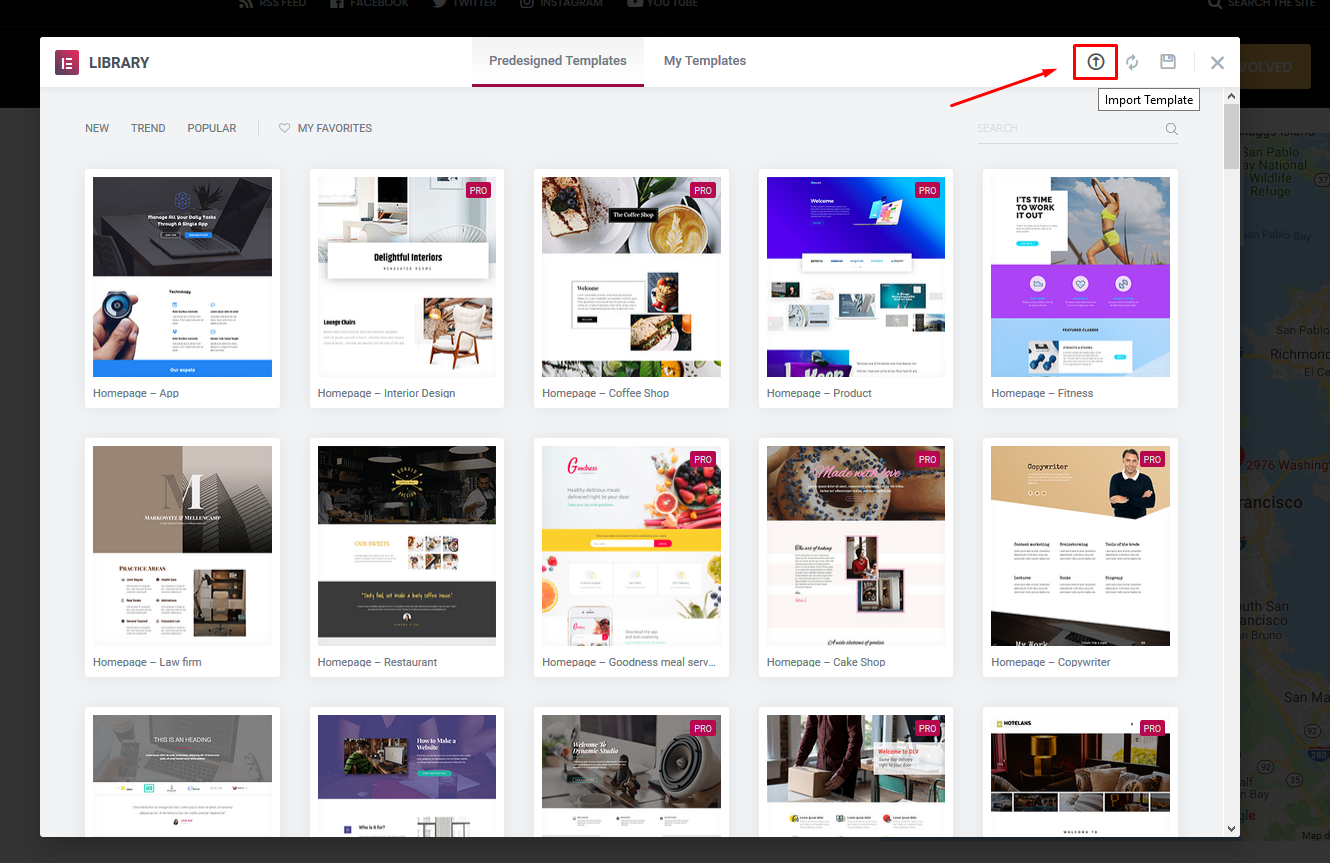
Find .json file on your computer and import Elementor template.
After that, the template will be available in the 'My Templates' section and you can insert the template into the page you are editing.
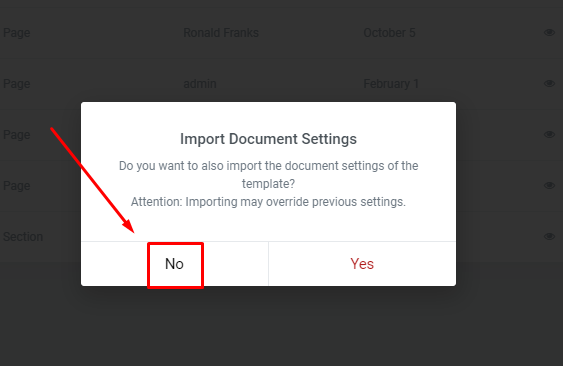
When you are inserting template hit 'No' option in the "Import Document Settings" modal window:
 ;
;
Important!
Due licenses all imported images are for testing purposes only and cannot be used on your live website!!!
You can download free photos for your commercial & personal works on sites like:
http://picjumbo.com/
http://pixabay.com/
https://unsplash.com/grid
Translation
This theme is translation/localization ready and comes with citygov.pot file. File is located in ../citygov/lang/ folder.
- You need to use localized WordPress installation (core) in the first place:

If not, localization will be not successful. - Download poedit software here,
- Install it and in this software translate
citygov.potfile (line by line), - Once you have translated all the strings, you can save this as your .po file.
The filename of your .po / .mo file is crucial! Gettext uses the ISO 639 standard for language abbreviations and ISO 3166 for locales. If your translation is written in deutsch for example, your file name will look like de_DE.po. Capitalization is also important here. For a full list of language and country codes, check out these two links:
Once you save, POEdit by default automatically creates a .mo file alongside your .po file. Put these files into 'lang' folder.
Your internationalization is complete!
Right-to-left (RTL) support
Step 1 – Test RTL support
Before we make a permanent switch to RTL mode, let’s test it out as an admin – in that way we can safely preview RTL support before making it available to all our website visitors.
Go to Plugins -> Add New and search for “RTL Tester” – or you can grab the plugin over on the WordPress.org repo.
Once you install the plugin you’ll see this new option in your WP toolbar
![]()
Once you click “Switch to RTL” the WordPress user interface switches to RTL mode.
Step 2 – Make Eleslider RTL ready
Go to Plugins > Plugin Editor and select 'Eleslider'. In right menu find assets/js/owl.carousel.start.js file and add rtl:true, line. save the change.
![]()
If you go to your website frontend you should also see that it now displays Right-to-left. Here’s what the CityGov WordPress theme looks like with RTL enabled.
![]()
Step 3 – Enable RTL Support permanently
Once you’re happy with how your website looks with RTL mode enabled, it’s time to make the switch permanent.
Hop on over to Settings > General > Site Language – and select your language.
Hit “Save Changes” and you’re done!
Once again, thank you so much for purchasing this theme.